Introduction
- Thank you for choosing the POVConnect app. We are pleased to have you with us. Enclosed is the documentation to help you set up and launch the app easily. Please read it carefully, as it contains important information. If you need any assistance or have questions, our support team is just a message away.
Prerequisites
- If you use the specified versions, our code will work properly because the libraries and SDKs we used have not been updated yet. Whenever those libraries are updated, we will also update the code accordingly. As long as you use the same versions, the code will function exactly as shown in the demo app without any issues, so there's no need to worry.
- We have used the following versions in this project, so you also need to use the same while setting it up:
- Flutter 3.35.4 → https://docs.flutter.dev/release/archive?tab=windows
- Java 21.0.6 → https://www.oracle.com/in/java/technologies/downloads/archive/
- Android Studio Meerkat Feature Drop → https://developer.android.com/studio/archive
- To modify this project, it's essential to ensure that Flutter and Dart are installed and properly configured on your computer. If you have already installed and configured the Android SDK, the steps to install Flutter are as follows:
- Download the Flutter SDK from the official website and extract it.
- Add the path to the previously extracted SDK to your PATH variable.
- Run the
flutter doctortool to verify if everything is configured correctly.
- For detailed instructions, please refer to: https://flutter.dev/docs/get-started/install/
Android Studio Windows Setup
- Download Android Studio: https://developer.android.com/studio/
- Access the Flutter SDK: https://flutter.dev/docs/get-started/install
- For further information on Android Studio: https://developer.android.com/studio/intro/
Step 1: Get the Flutter SDK
- Please download the provided installation bundle to access the latest stable release of the Flutter SDK. Upon downloading, extract the zip file and place the 'flutter' directory in your chosen installation directory (e.g.,
C:\src\flutter). Avoid installing Flutter in directories such asC:\Program Files, as it may require elevated privileges.
Step 2: Update your path
- To enable running Flutter commands in the regular Windows console, follow these steps to add Flutter to the PATH environment variable:
- Open the Start menu and search for 'env', then select 'Edit environment variables for your account'.
- In the User variables section, check if there is an entry named Path.
- If the Path entry already exists, append the full path to the
flutter\bindirectory using;as a separator from existing values. - If the Path entry doesn't exist, create a new user variable named Path and set its value to the full path to the
flutter\bindirectory. - Remember to close and reopen any existing console windows for these changes to take effect.
Step 3: Run flutter doctor
- From a console window with the Flutter directory added to the PATH, execute the following command to check for any platform dependencies that may be required to complete the setup:
flutter doctor
- If any complications arise during the environment setup, refer to: https://flutter.dev/docs/get-started/install/windows
Android Studio macOS Setup
- Download Android Studio: https://developer.android.com/studio/
- Download Xcode from the App Store: https://apps.apple.com/us/app/xcode/id497799835?mt=12
- Access the Flutter SDK: https://flutter.dev/docs/get-started/install
Step 1: Get the Flutter SDK
- Please download the provided installation bundle to acquire the latest stable release of the Flutter SDK. After downloading, extract the SDK by double-clicking on the downloaded file. Subsequently, copy the extracted folder and paste it into your desired location, such as
Documents\flutter.
Step 2: Update your path
- To update the PATH variable and access the "flutter" command from the terminal, follow these steps:
- Open the terminal.
- For updating the PATH variable for the current terminal window only, enter:
export PATH="$PATH:`pwd`/flutter/bin"
- To update the PATH variable permanently, open or create the .bash_profile file:
sudo open -e $HOME/.bash_profile
- Append the following line to the .bash_profile file:
export PATH="$PATH:[PATH_TO_FLUTTER_SDK_DIRECTORY]/flutter/bin"
- Replace
[PATH_TO_FLUTTER_SDK_DIRECTORY]with the actual path to the Flutter SDK folder. - Refresh the PATH variables:
source $HOME/.bash_profile
- Verify that the SDK is successfully installed:
flutter doctor
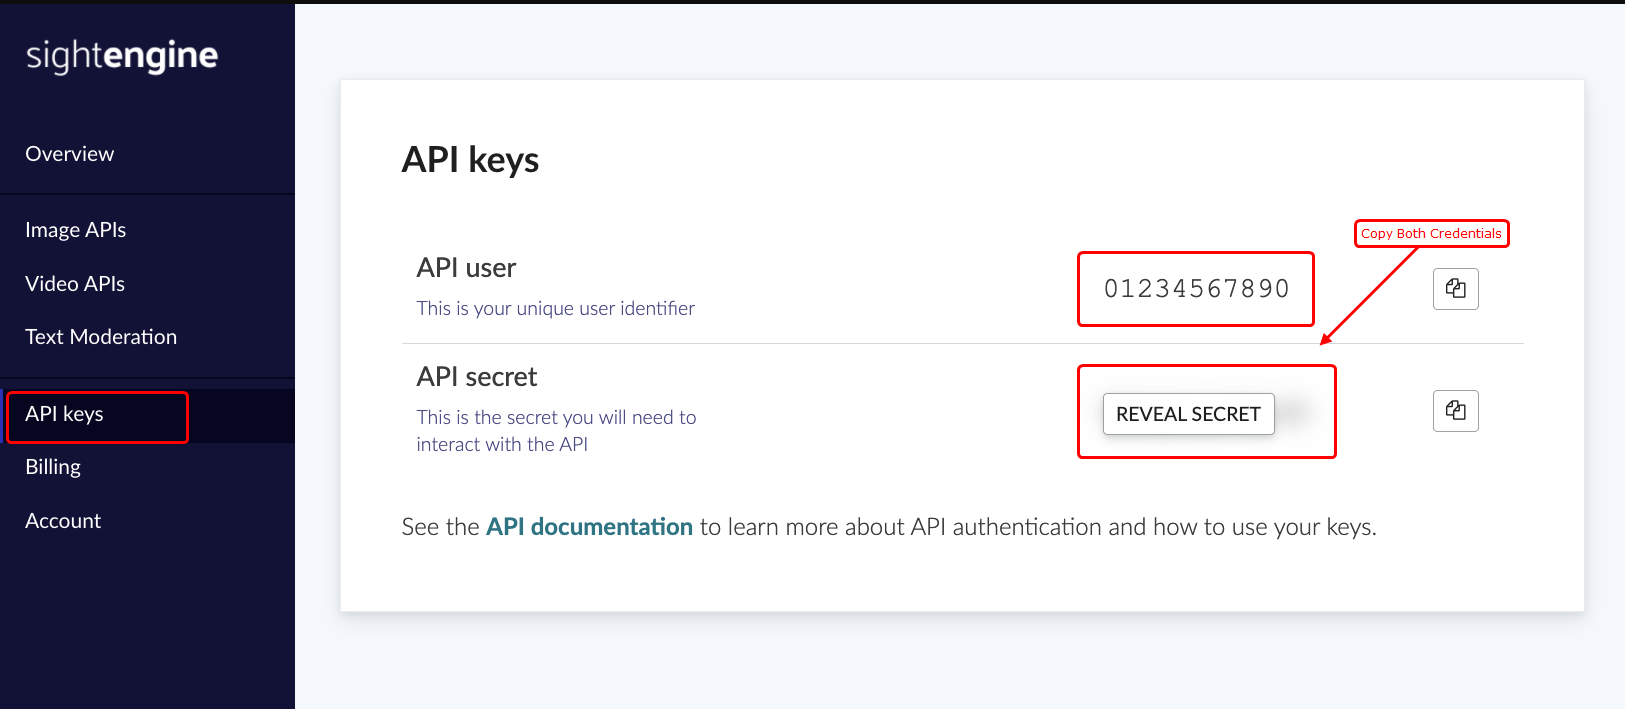
Setup Sightengine
- The Sightengine API uses a key pair that consists of an API user id and an API secret for authentication. To get your own API credentials, create an account at https://dashboard.sightengine.com/ and go to the API key page to retrieve them.
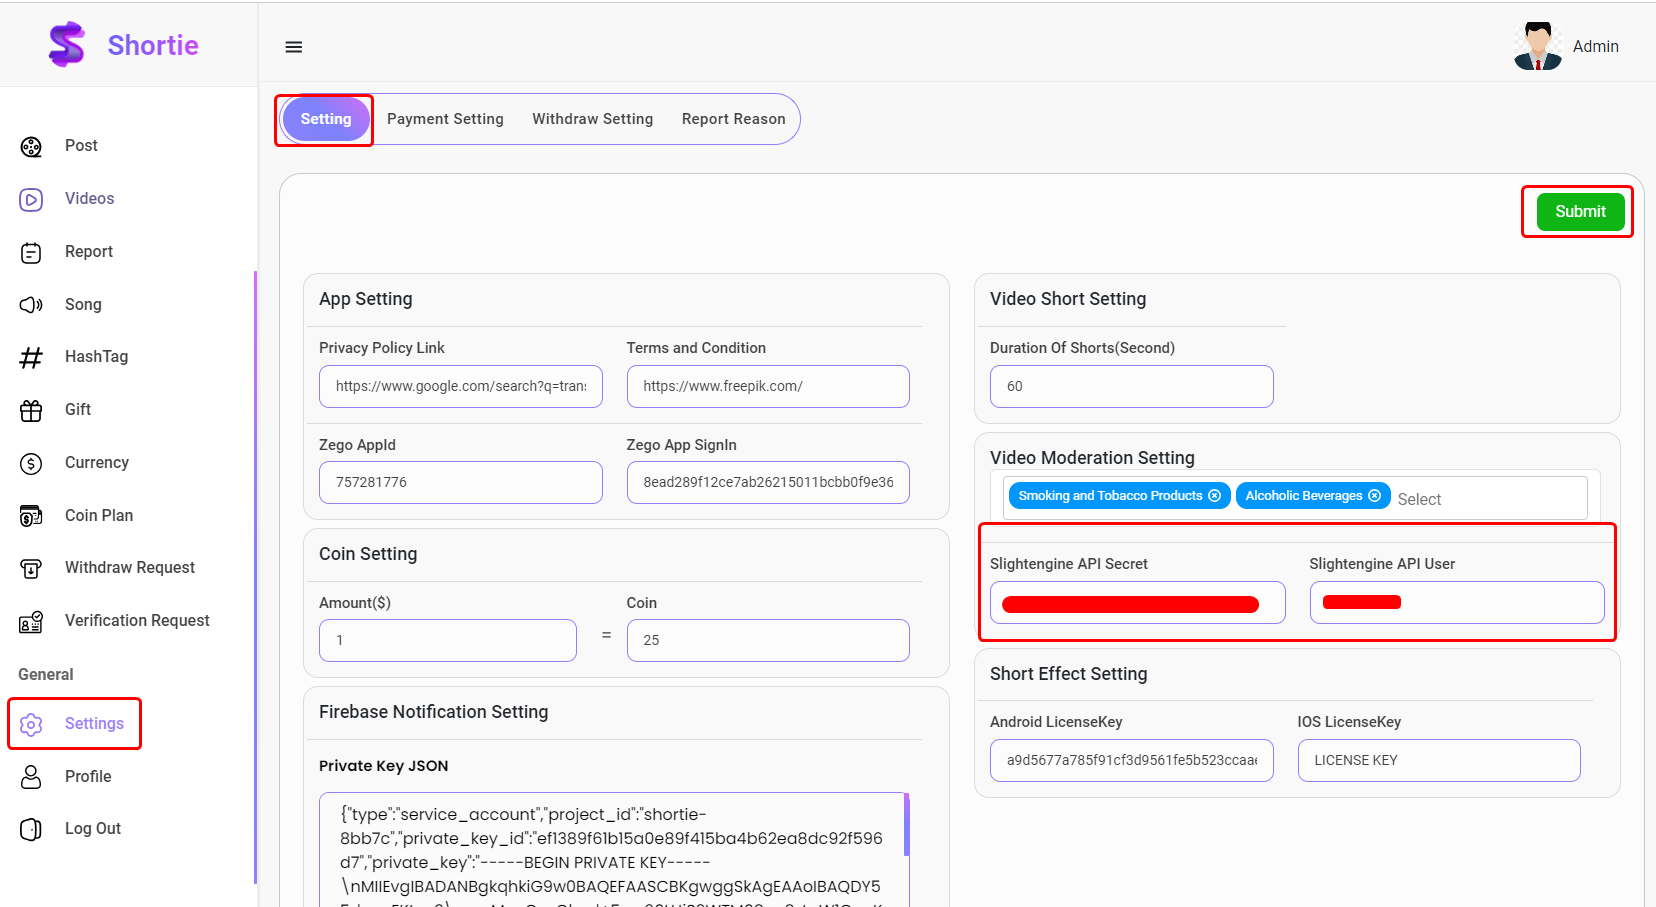
- Copy the API User ID and API Secret, and paste them into the Admin Panel as shown below.
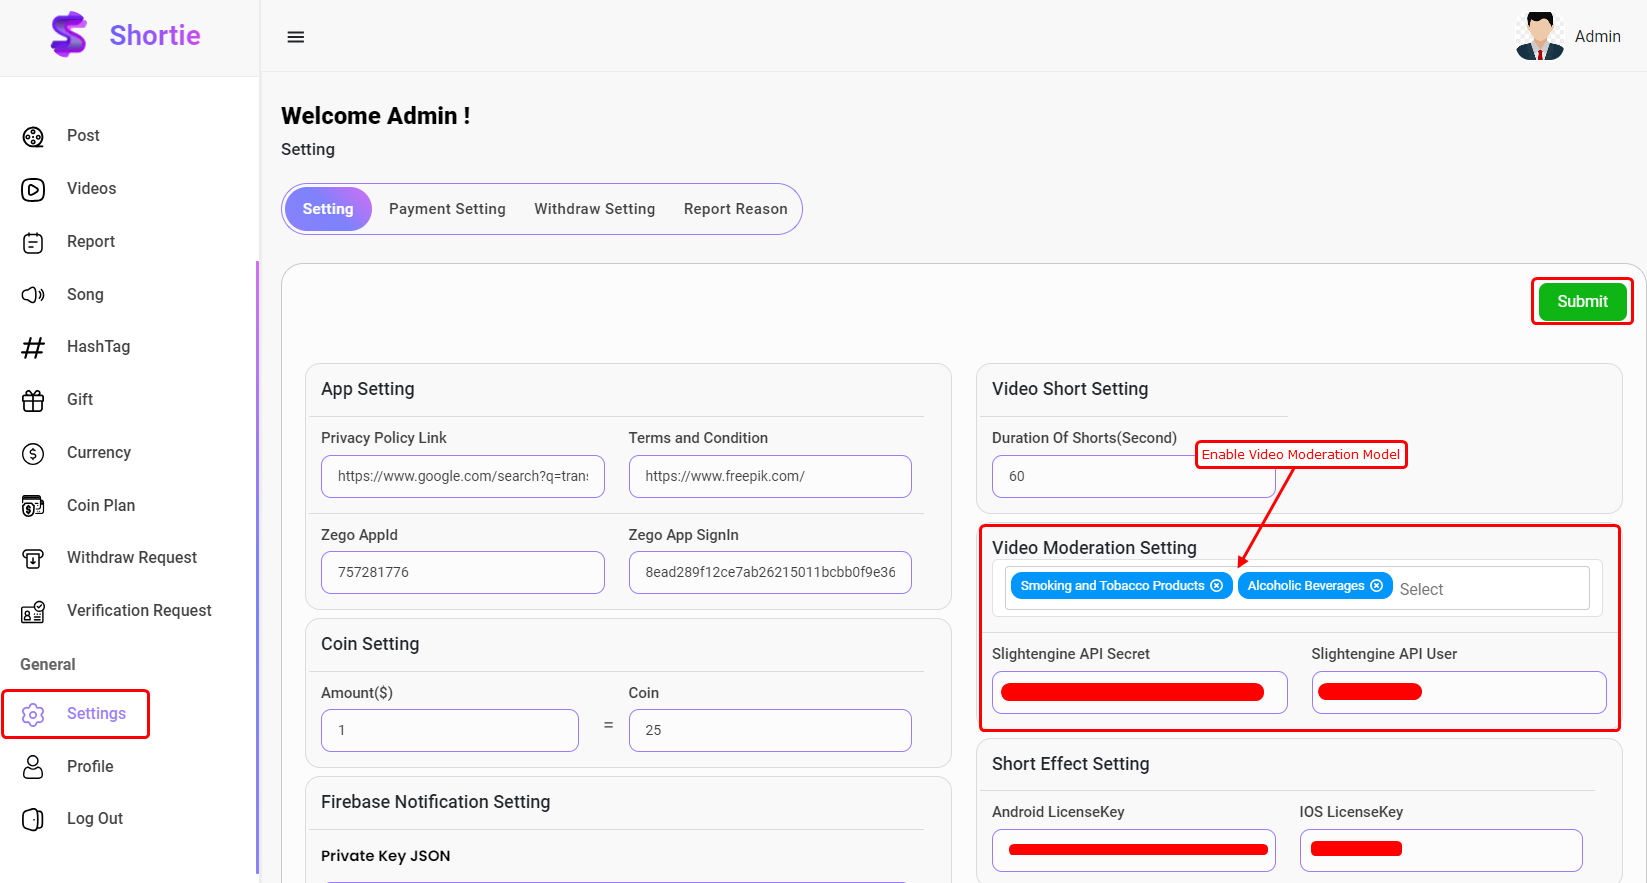
- To enable video moderation, you must first activate the moderation model from the admin panel. Once enabled, any sensitive videos in the app will be displayed with a blur effect.
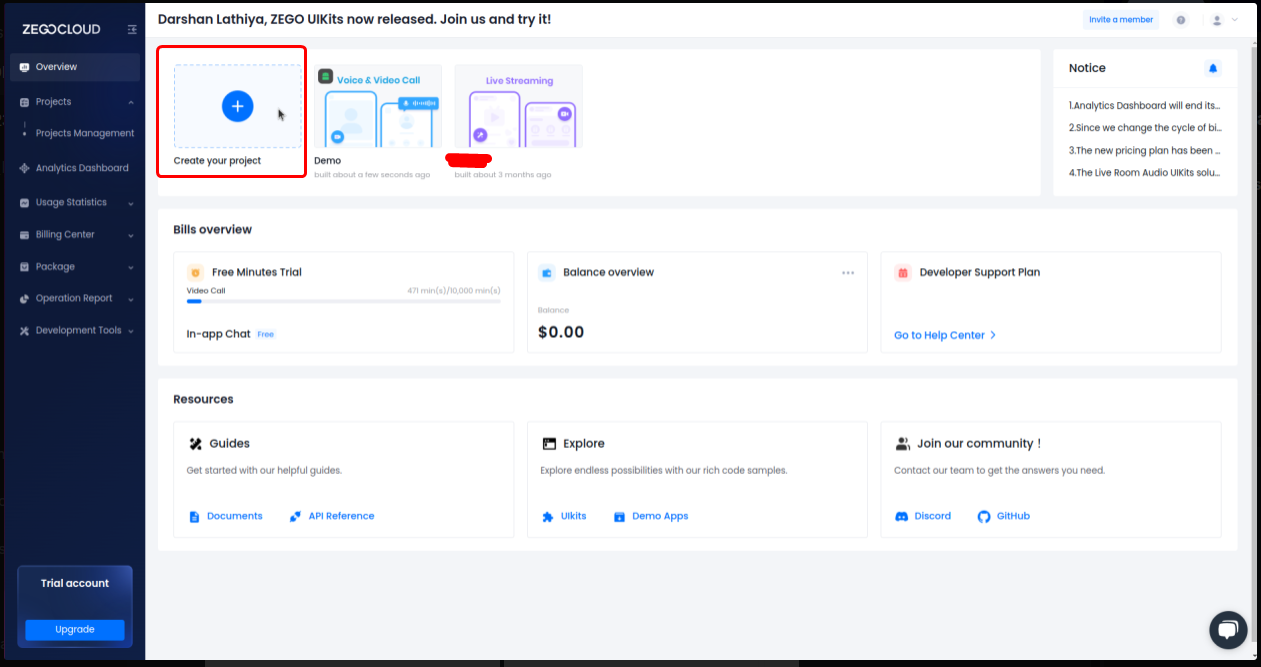
Setup Zego Cloud
- Open the Zego Cloud console: https://console.zegocloud.com/account/signup
- Generate a Zego App ID.
- To use the live-streaming function, you must generate a secret key in the Zego Cloud console.
- Enter the Zego Cloud App ID and Zego Cloud App Sign In details in the admin panel under the settings section.
Setup DeepAR
- Copy android key and ios key.
- Please paste the Android Key and IOS Key into the settings page within the admin panel as shown below.
Configure Firebase
- Please navigate to your Firebase project, which you may have created while following the backend documentation. If you haven't created one yet, please follow the steps below to set up a project:
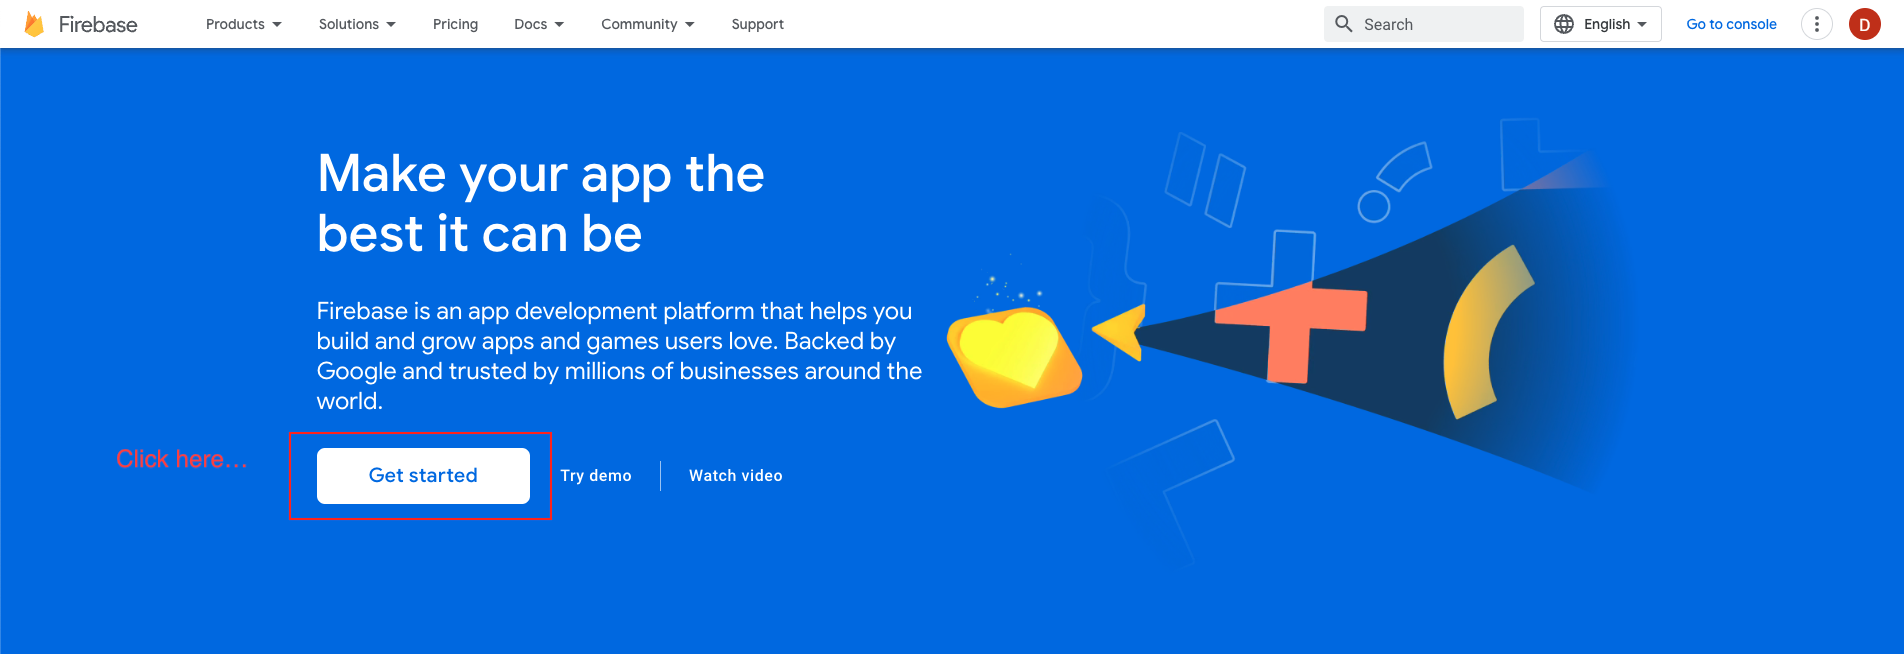
- Begin by visiting the Firebase website: https://firebase.google.com/
- If you do not already have a Firebase account, kindly sign up for one. Otherwise, proceed to sign in with your existing account credentials.
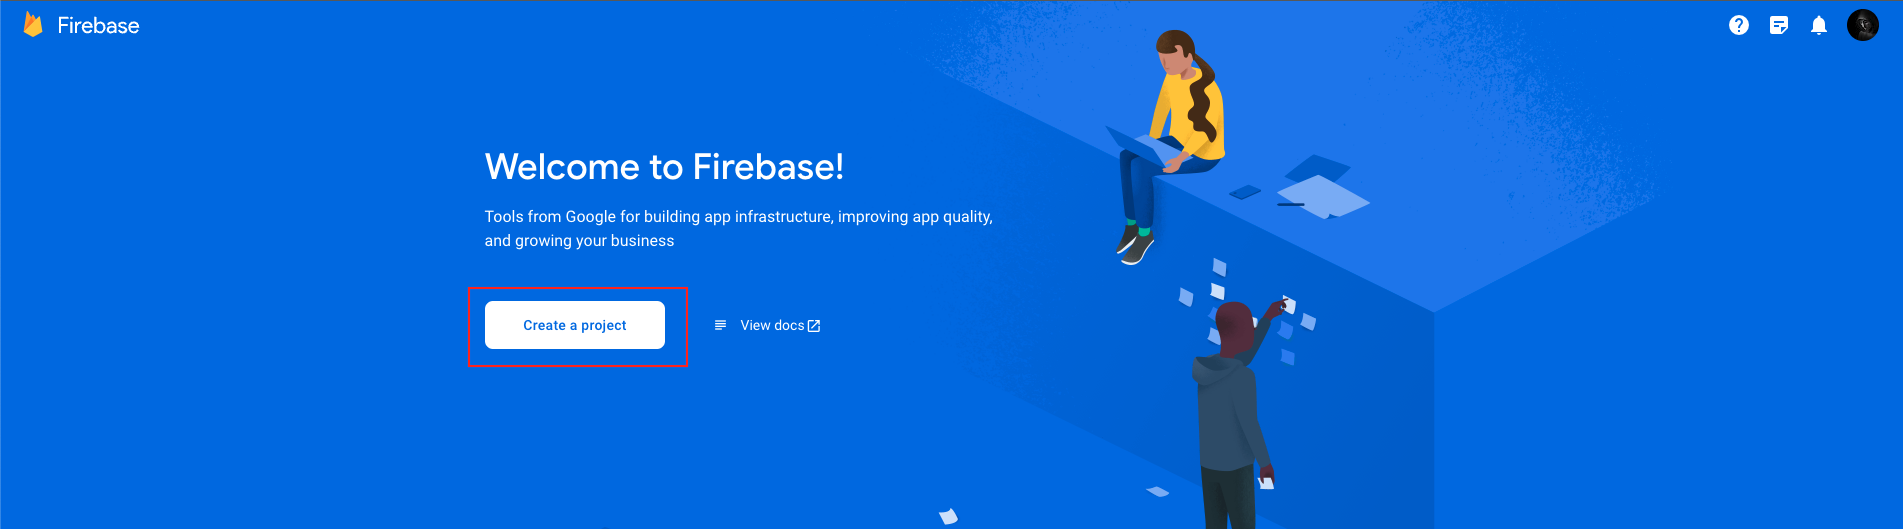
- Upon successful login, you will be directed to the Firebase Console. Click on the "Add project" button to initiate the creation of a new project.
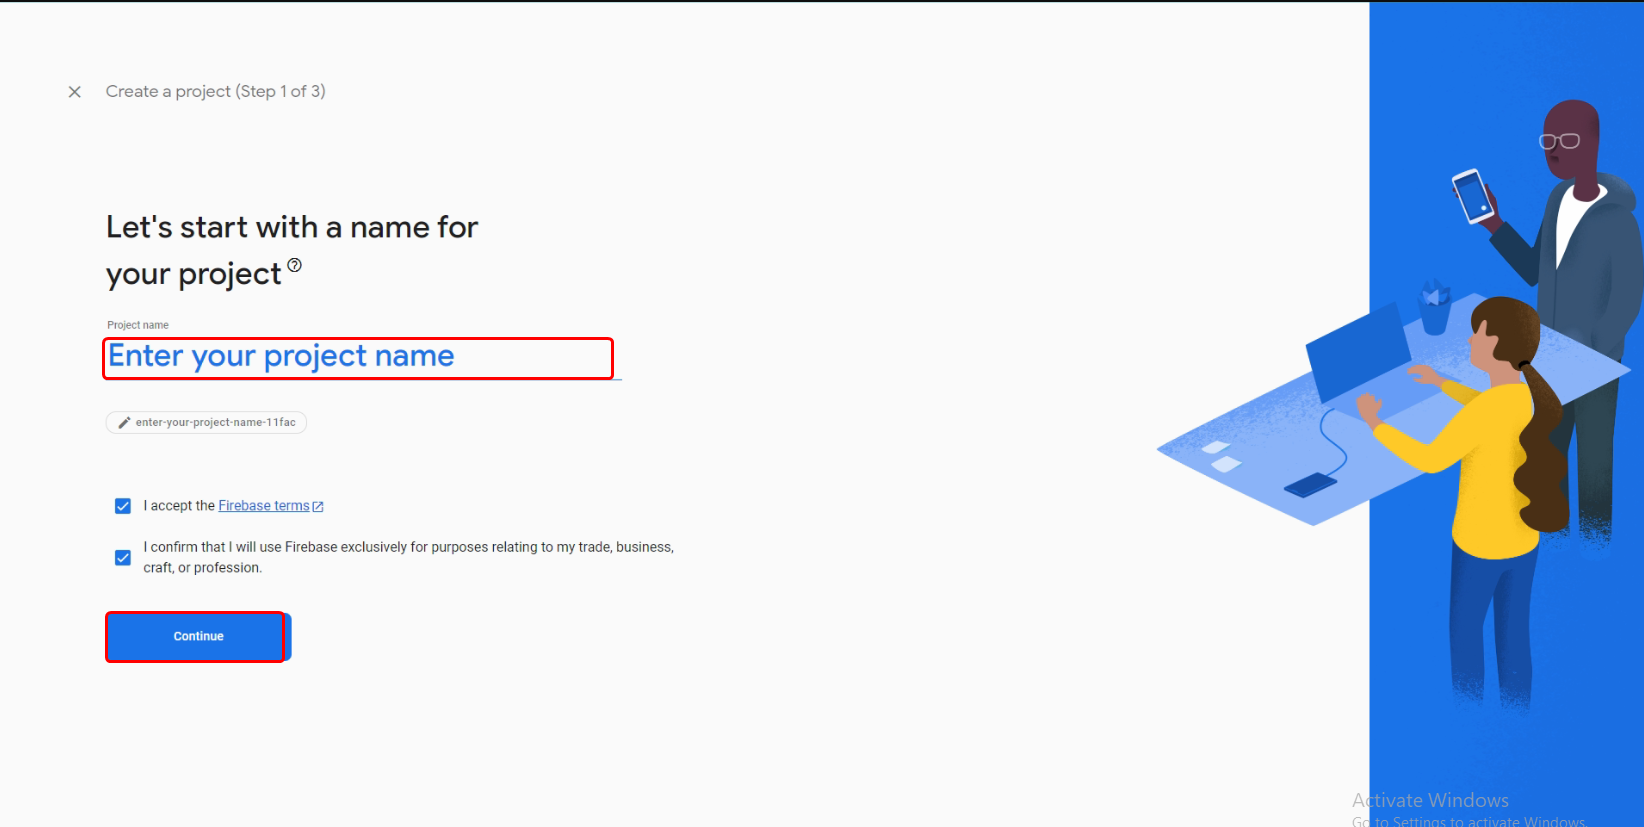
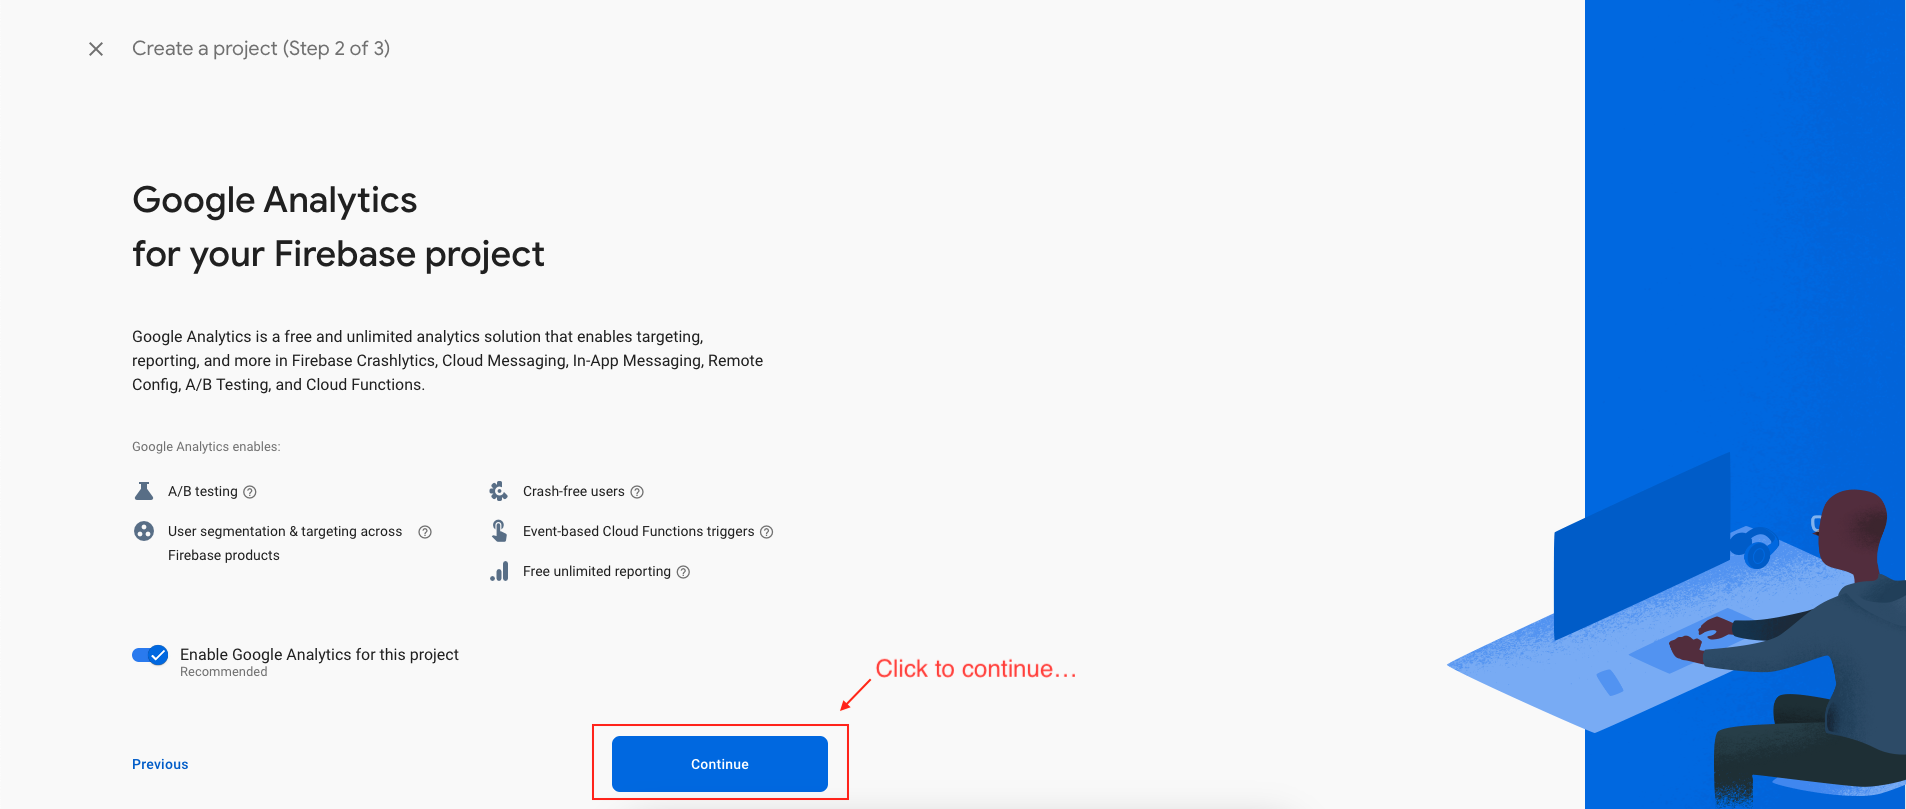
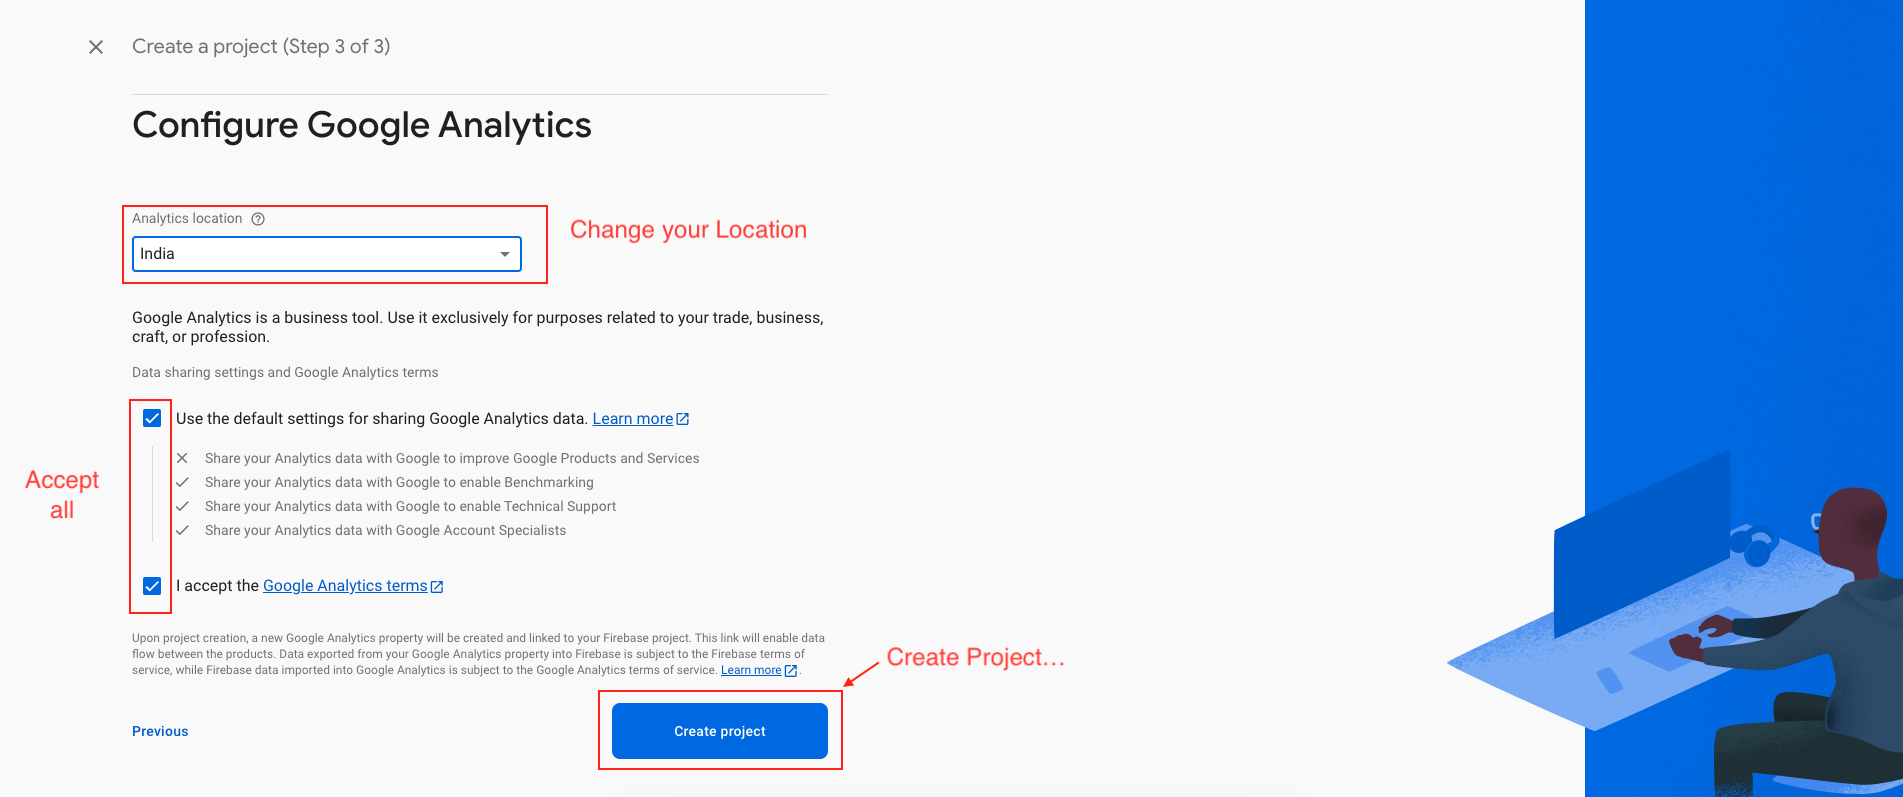
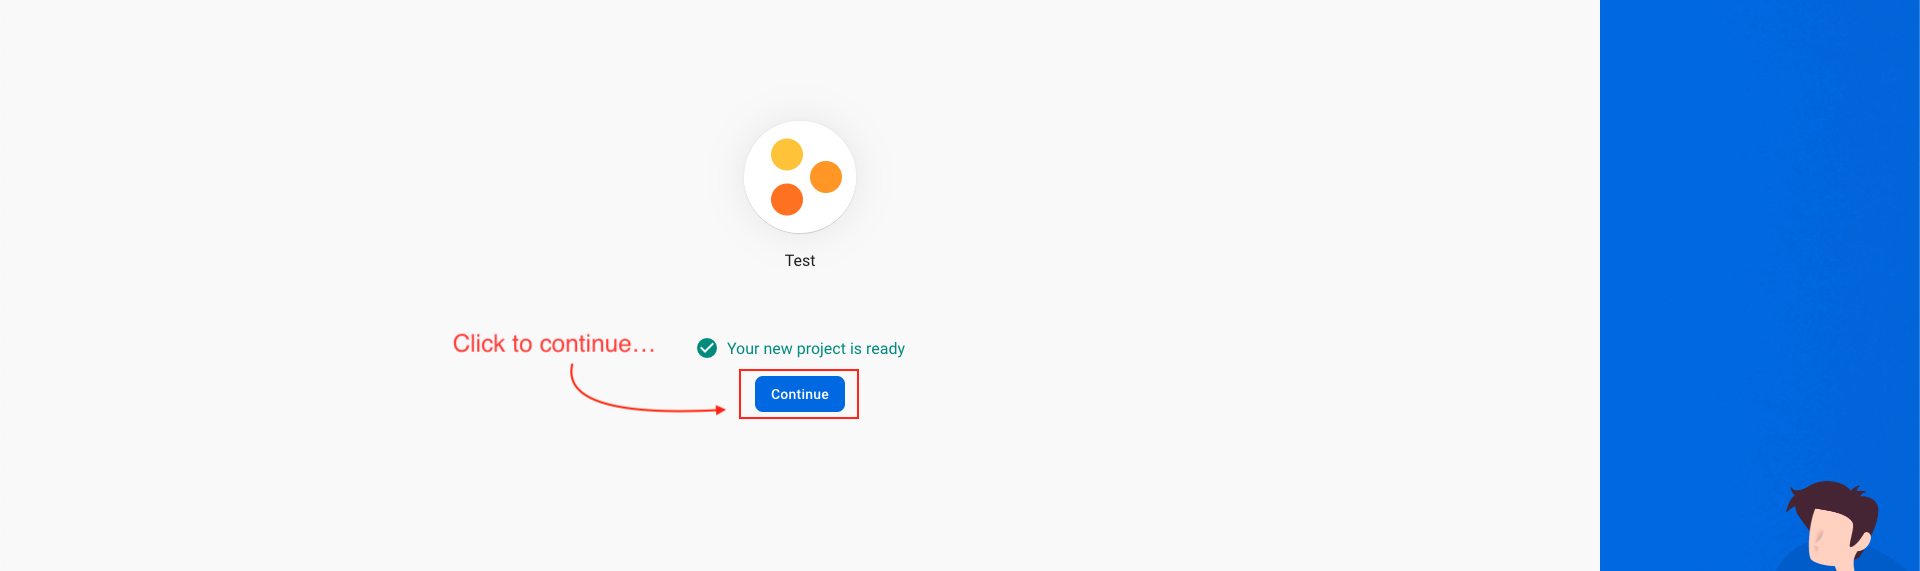
- Enter a suitable name for your project and configure your preferred options for Firebase Analytics and Google Analytics. Subsequently, click on the "Continue" button.
- First, select the default Firebase account, then proceed to create the project.
Download Firebase Private Key
- Here's a step-by-step guide to downloading your Firebase private key:
- If you have multiple projects, select the Firebase project for which you need the private key.
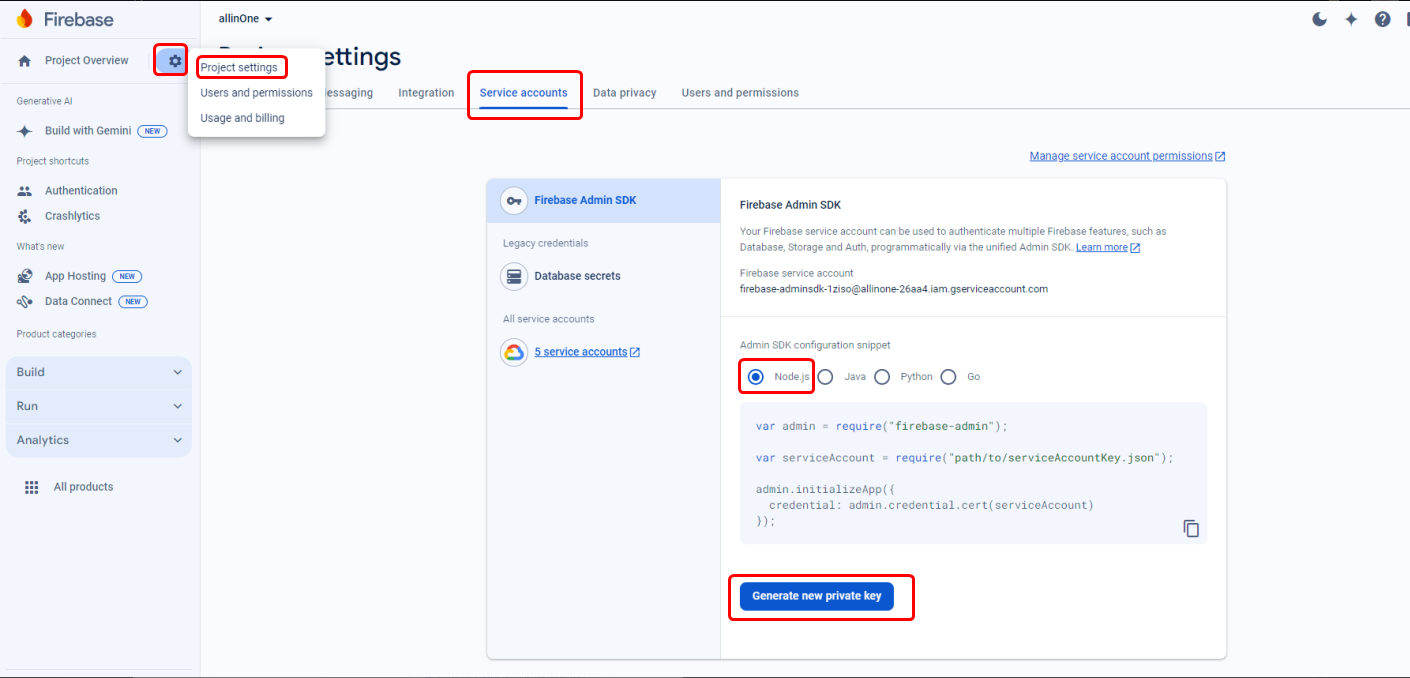
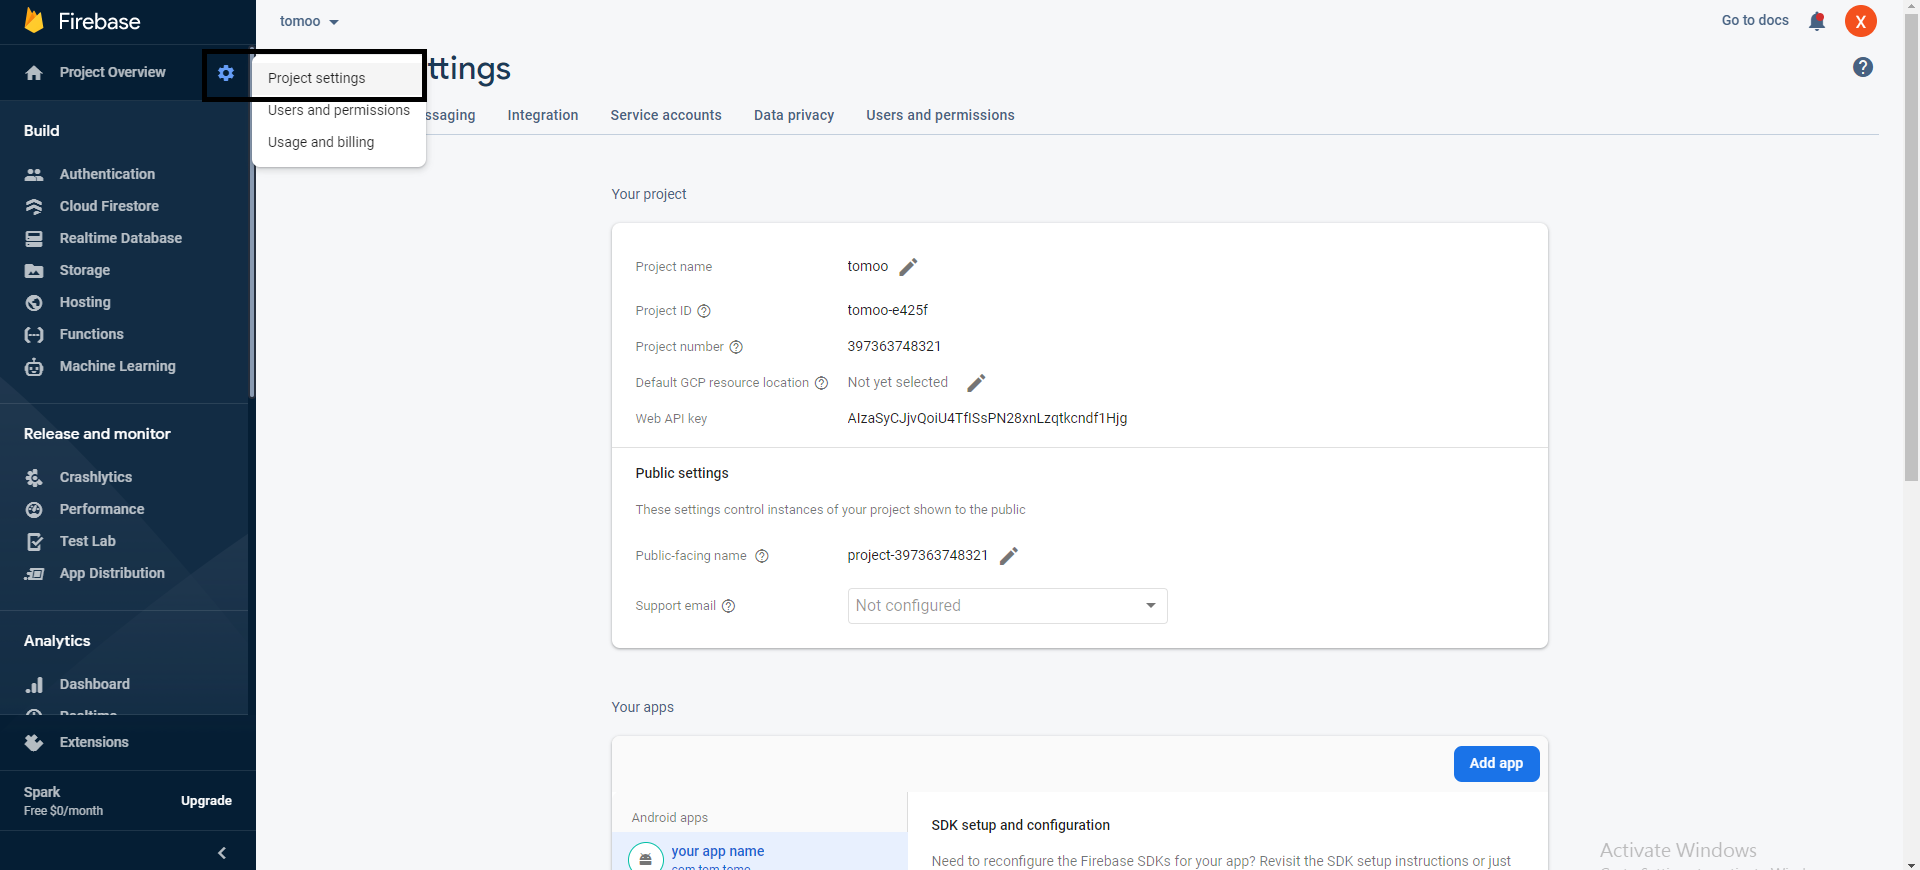
- Click on the gear icon (Settings) next to "Project Overview" on the top left corner of the Firebase Console.
- In the project settings, navigate to the "Service Accounts" tab.
- Scroll down to the "Firebase Admin SDK" section.
- Click on the "Generate New Private Key" button.
- A prompt will appear asking you to confirm your action.
- Once downloaded, store the JSON file containing the private key securely on your local machine.
- Please update the downloaded private key file in the 'Private Key' section of the Firebase Notification settings.

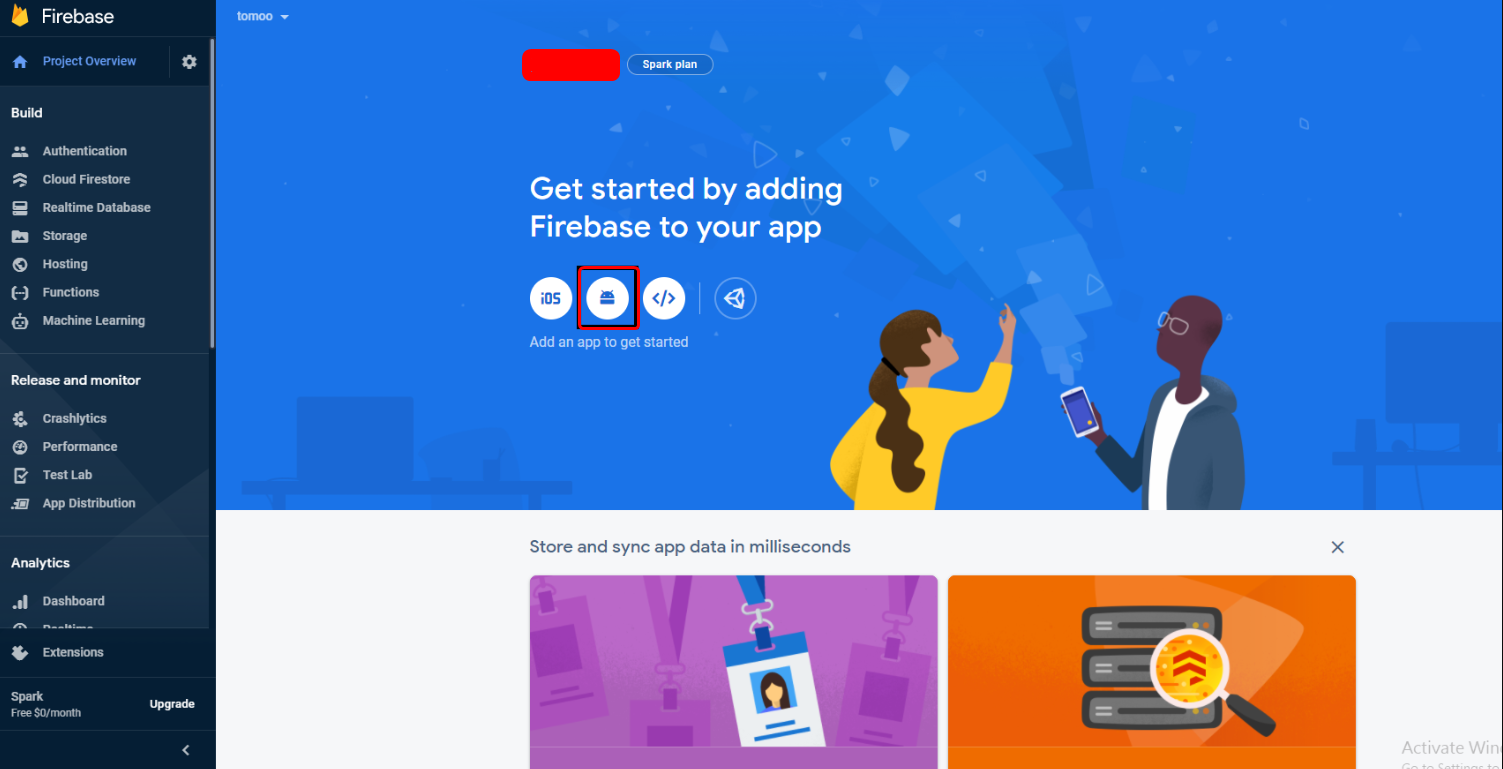
Add Android App To Firebase
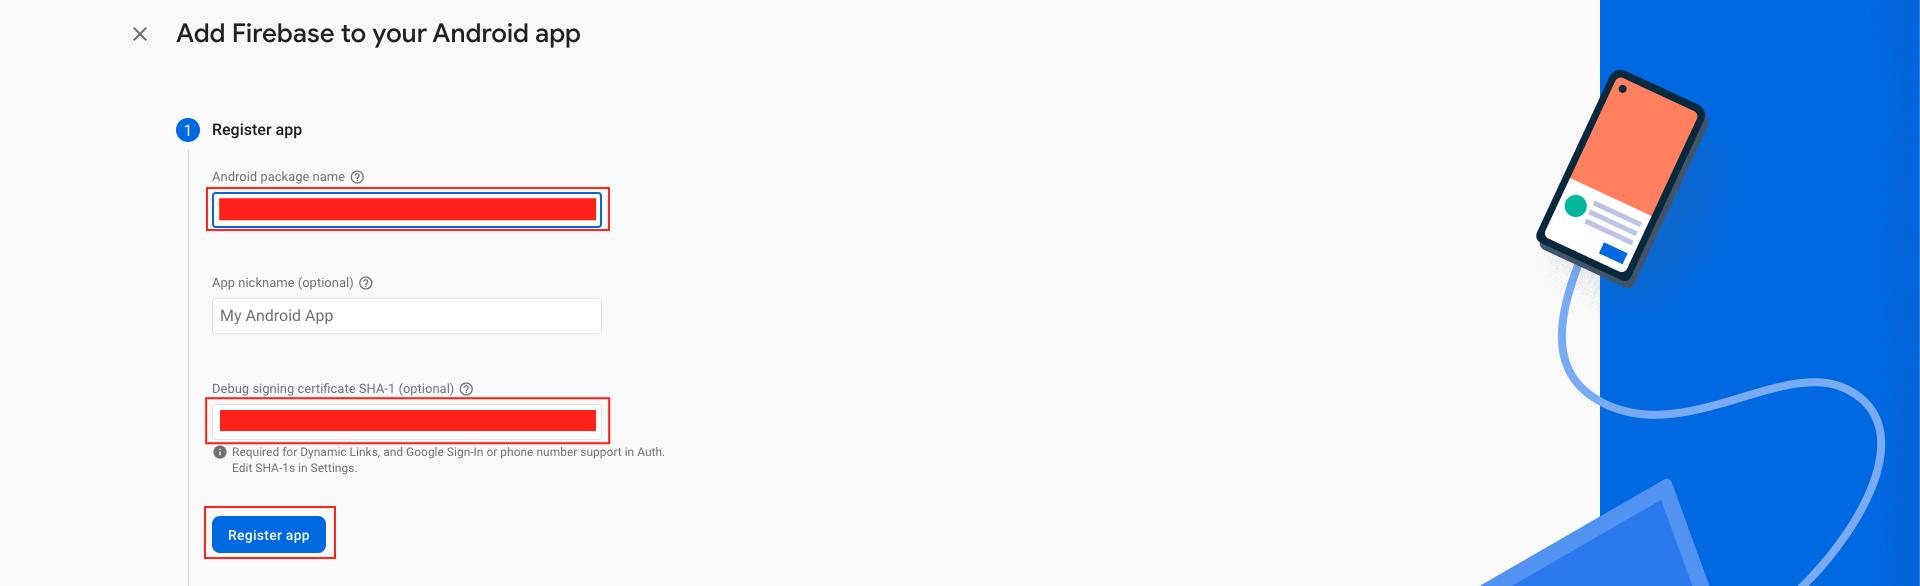
- In the next step, we have to choose the platform to add Firebase to our application. Click on Android.
- Your package name is generally the applicationId in your build.gradle (app-level) file. Refer to the SHA-1 key page for guidance on utilizing keytool to obtain the SHA-1 hash of your signing certificate. Add your applicationid in the first field and SHA-1 to the third field as shown in the image below.
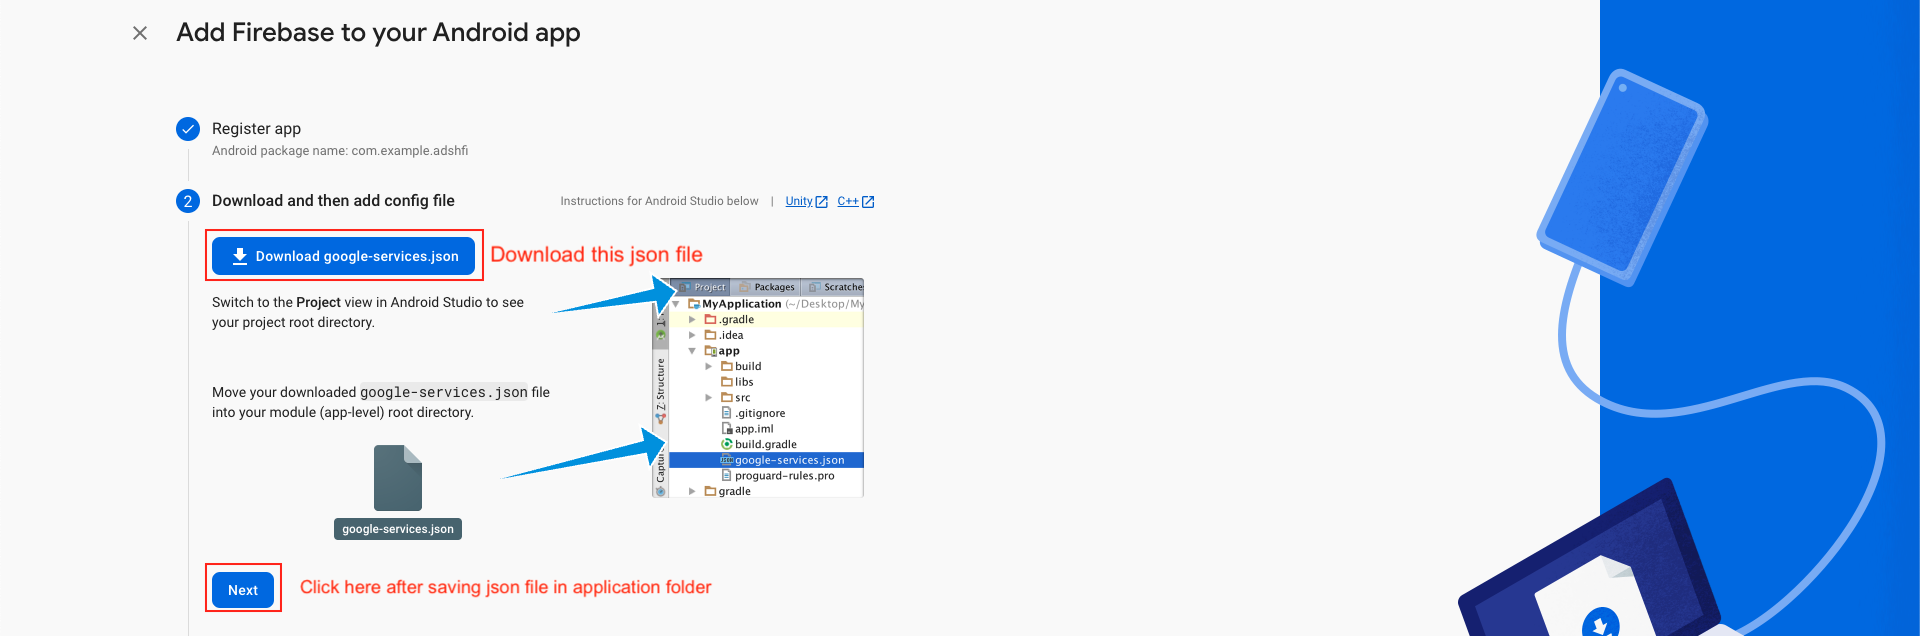
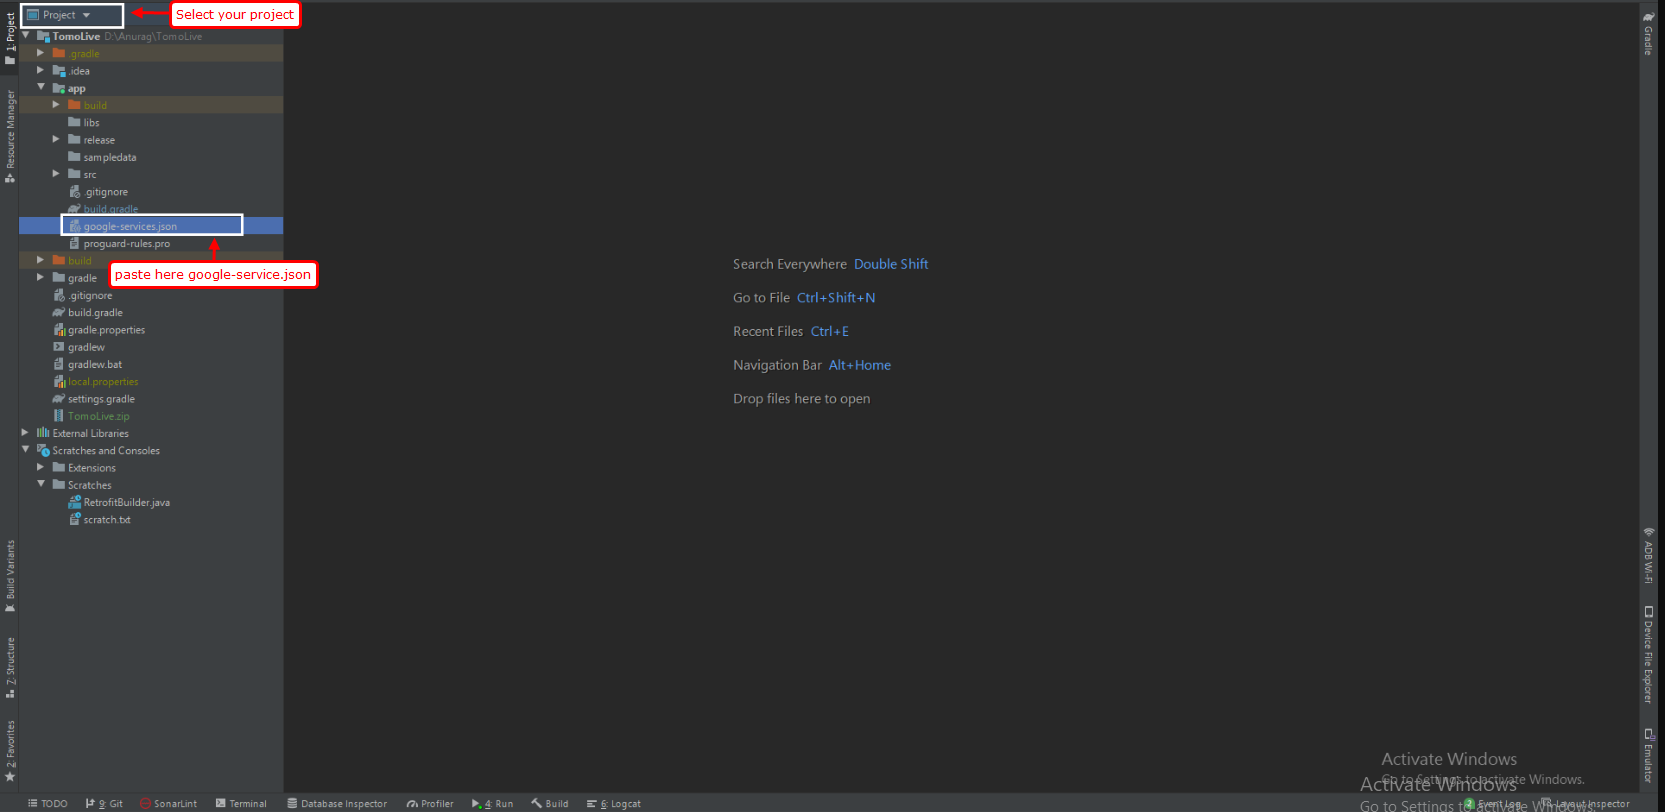
- Download the google-services.json file & place it in your project's app root directory.
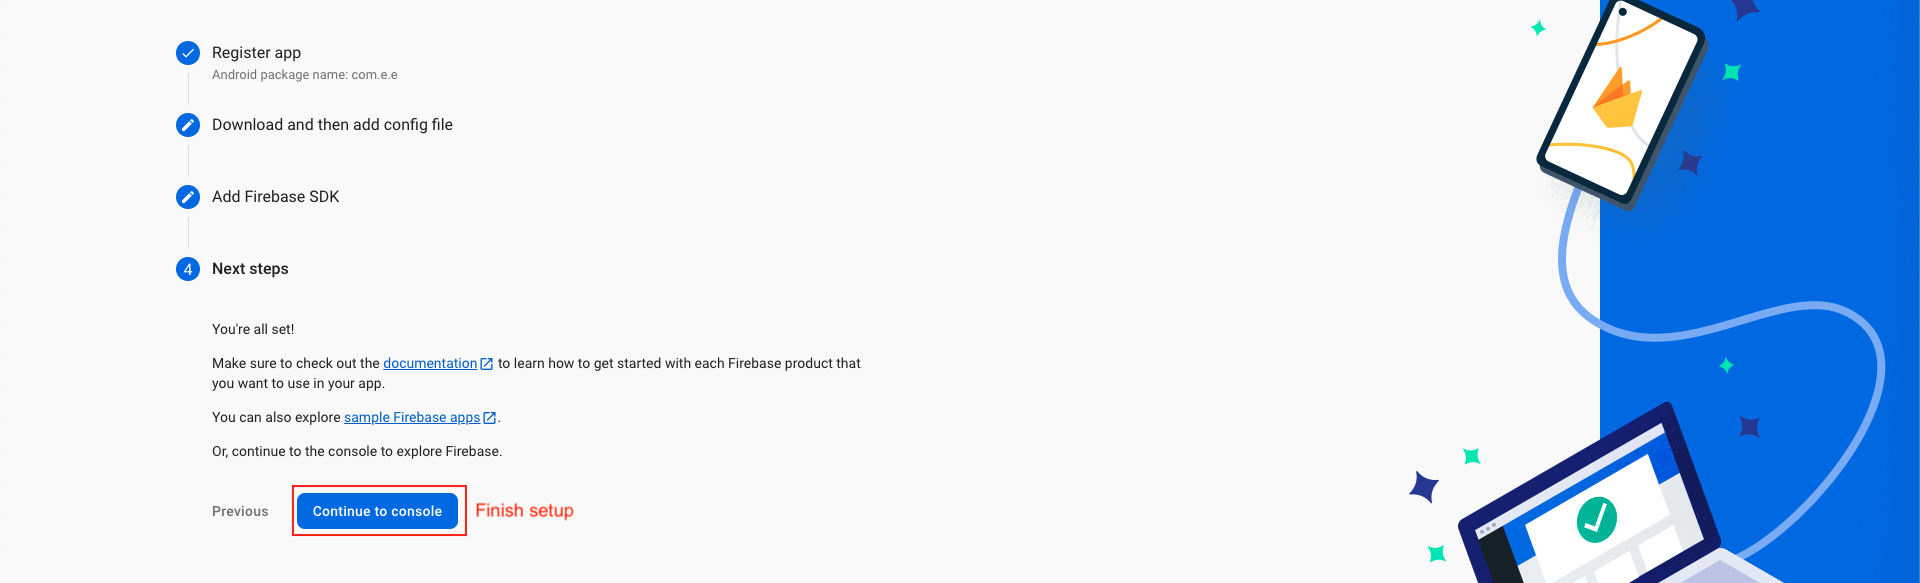
- Back in the Firebase console-setup workflow, click Next to skip the remaining steps and then finish and complete.
Step 1: Enter SHA Key in Firebase Console
- If you fail to provide the SHA-1 key in the Firebase project, functionalities such as phone login and Google login will be impaired. It is essential to add your SHA-1 keys for both debug and live modes to ensure seamless operation.

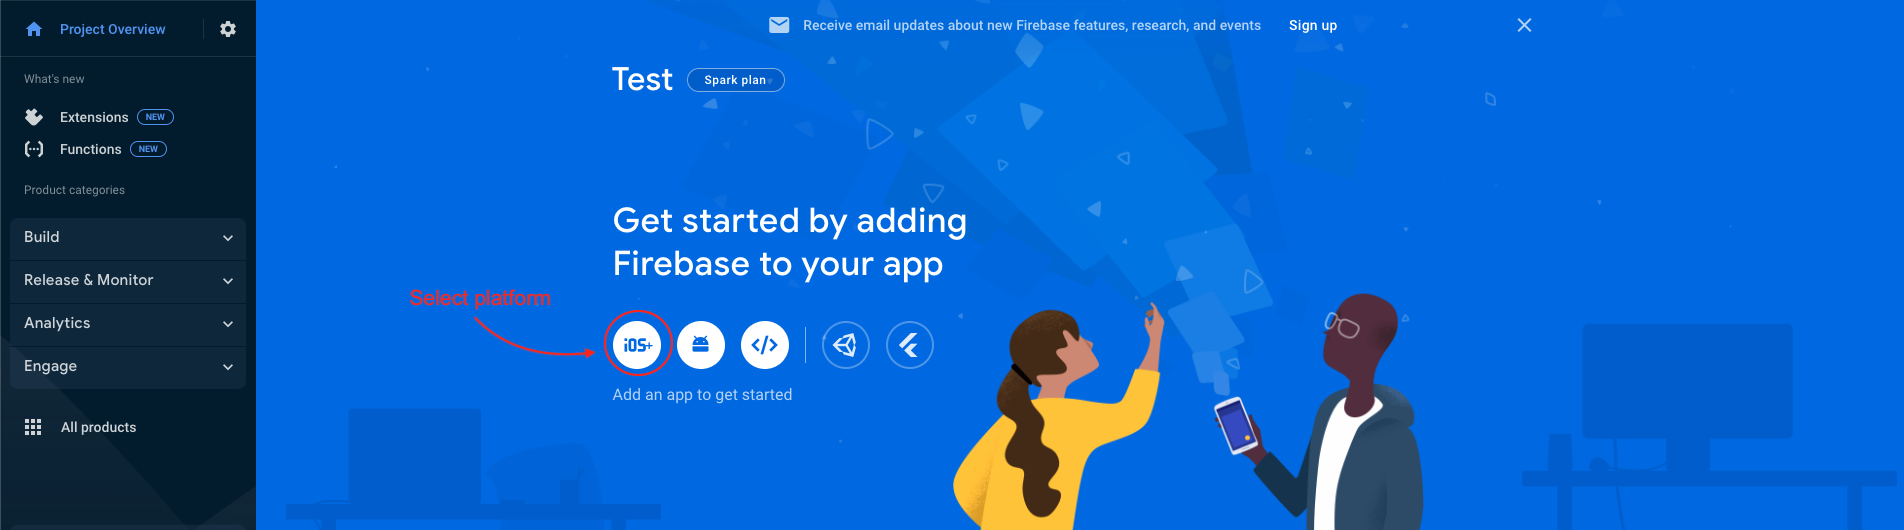
Add IOS App In Firebase
- We have to choose the platform to add Firebase to our application. Click on iOS.
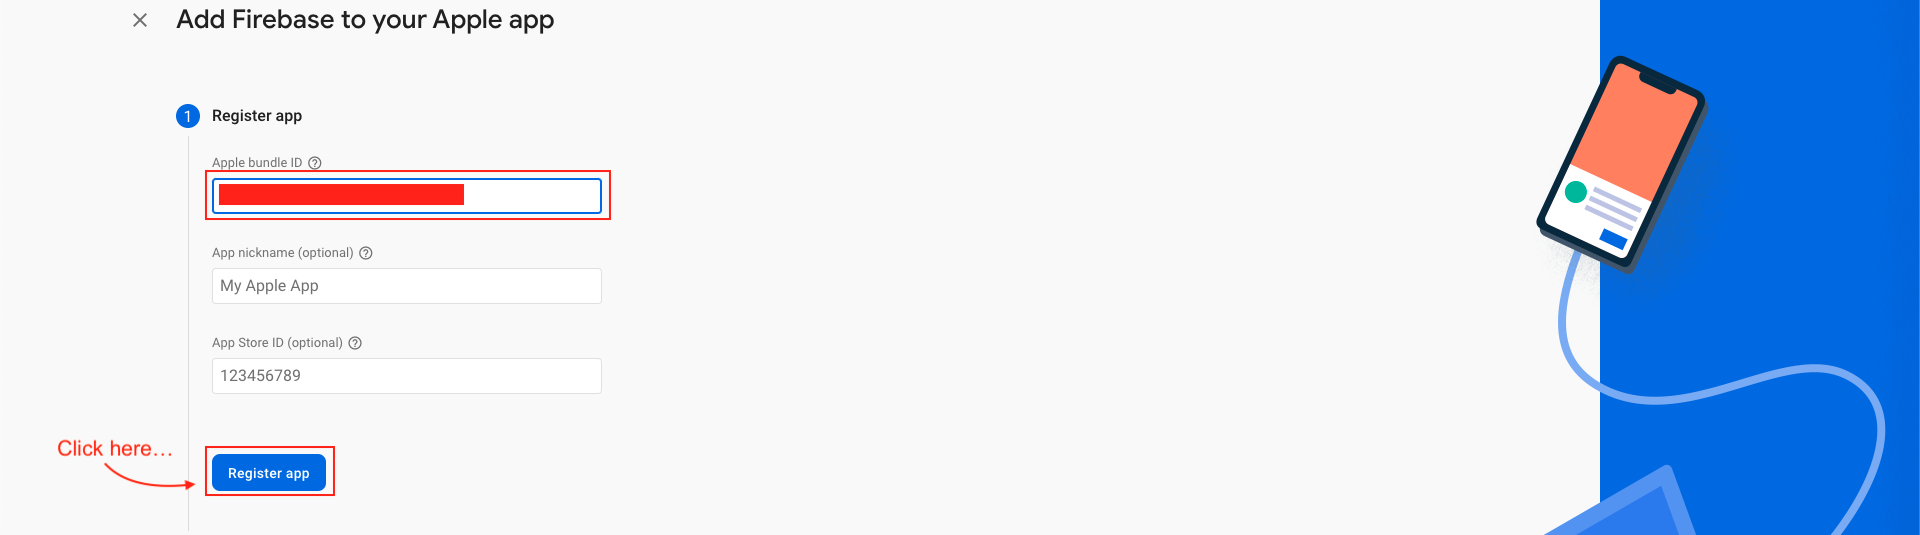
- On the next screen, enter your iOS bundle ID & App nickname and click on Register App. You can find your bundle ID in the General tab for your app's primary target in Xcode. If specified, the app nickname will be used throughout the Firebase console to represent this app.
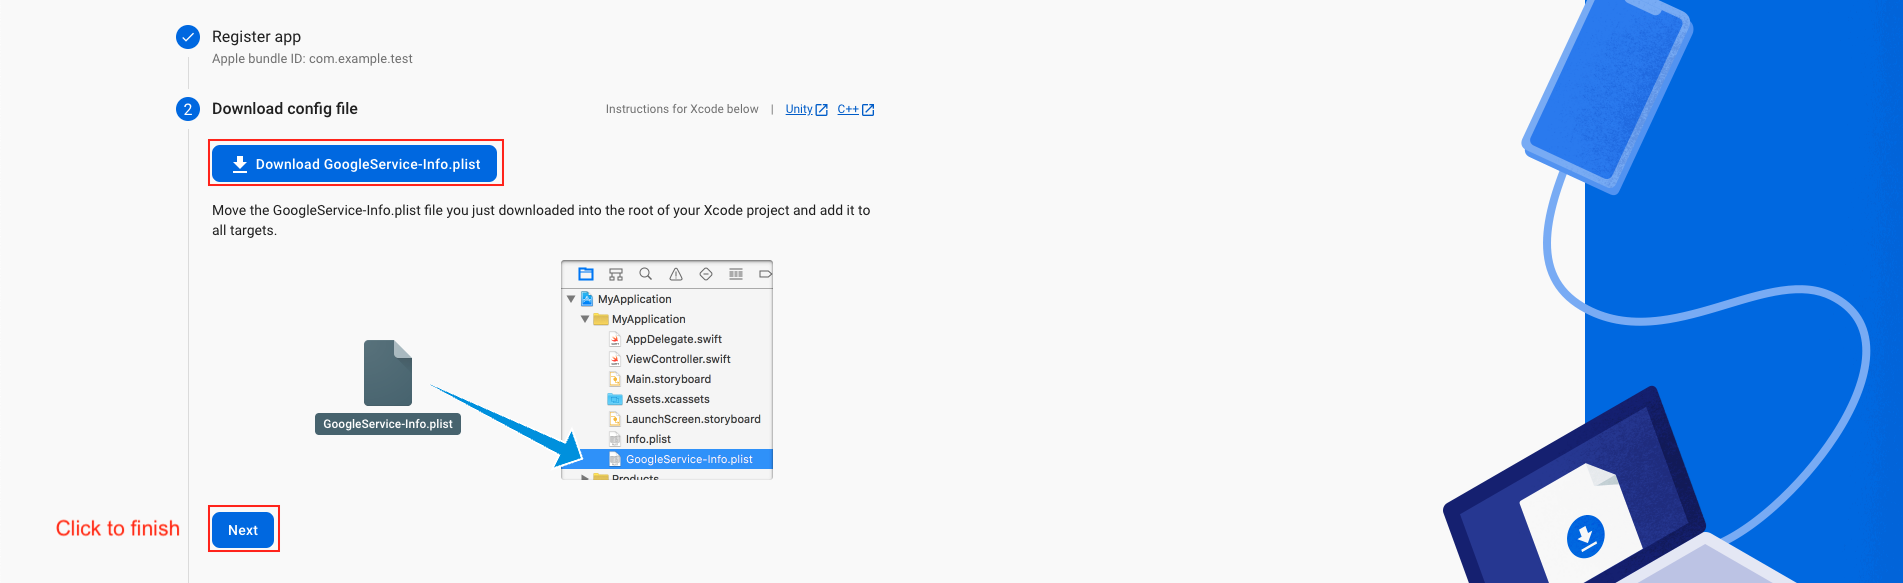
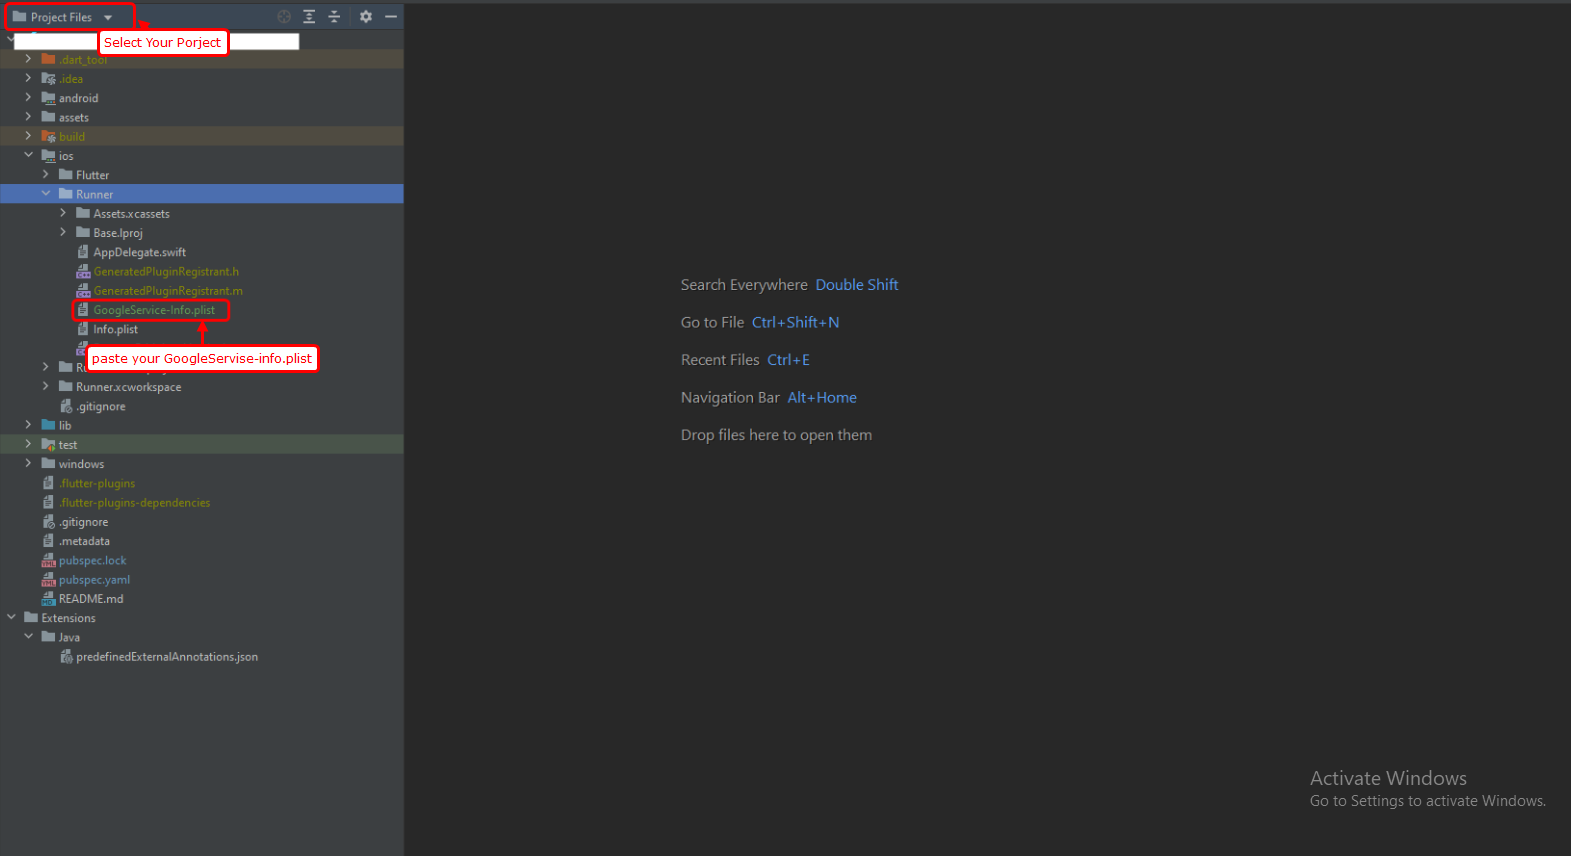
- Download the GoogleService-Info.plist file & move the GoogleService-Info.plist file you just downloaded into the root of your Xcode project and add it to all targets.
- Back in the Firebase console-setup workflow, click Next to skip the remaining steps and then finish and complete.
Step 1: Enter SHA Key in Firebase Console
- If you fail to provide the SHA-1 key in the Firebase project, functionalities such as phone login and Google login will be impaired. It is essential to add your SHA-1 keys for both debug and live modes to ensure seamless operation.
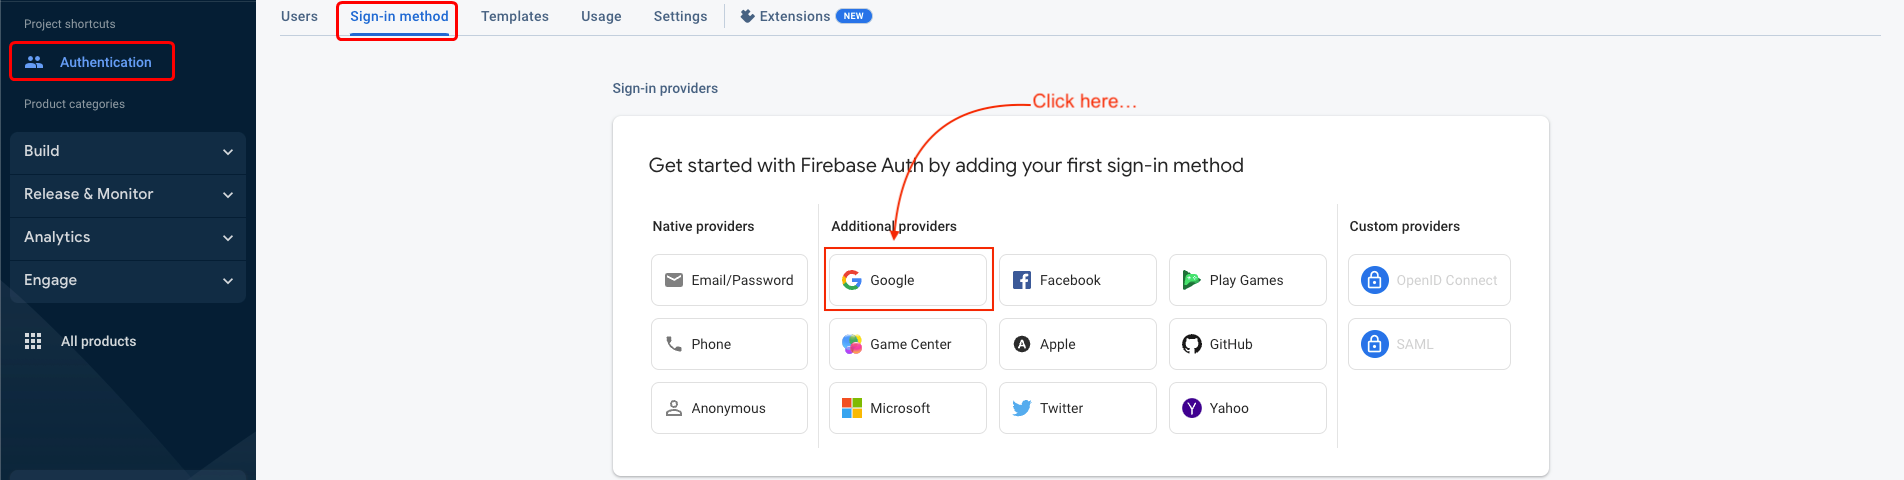
Google Sign In Configuration
- Navigate to the "Authentication" section and select the "Sign-in method" tab.
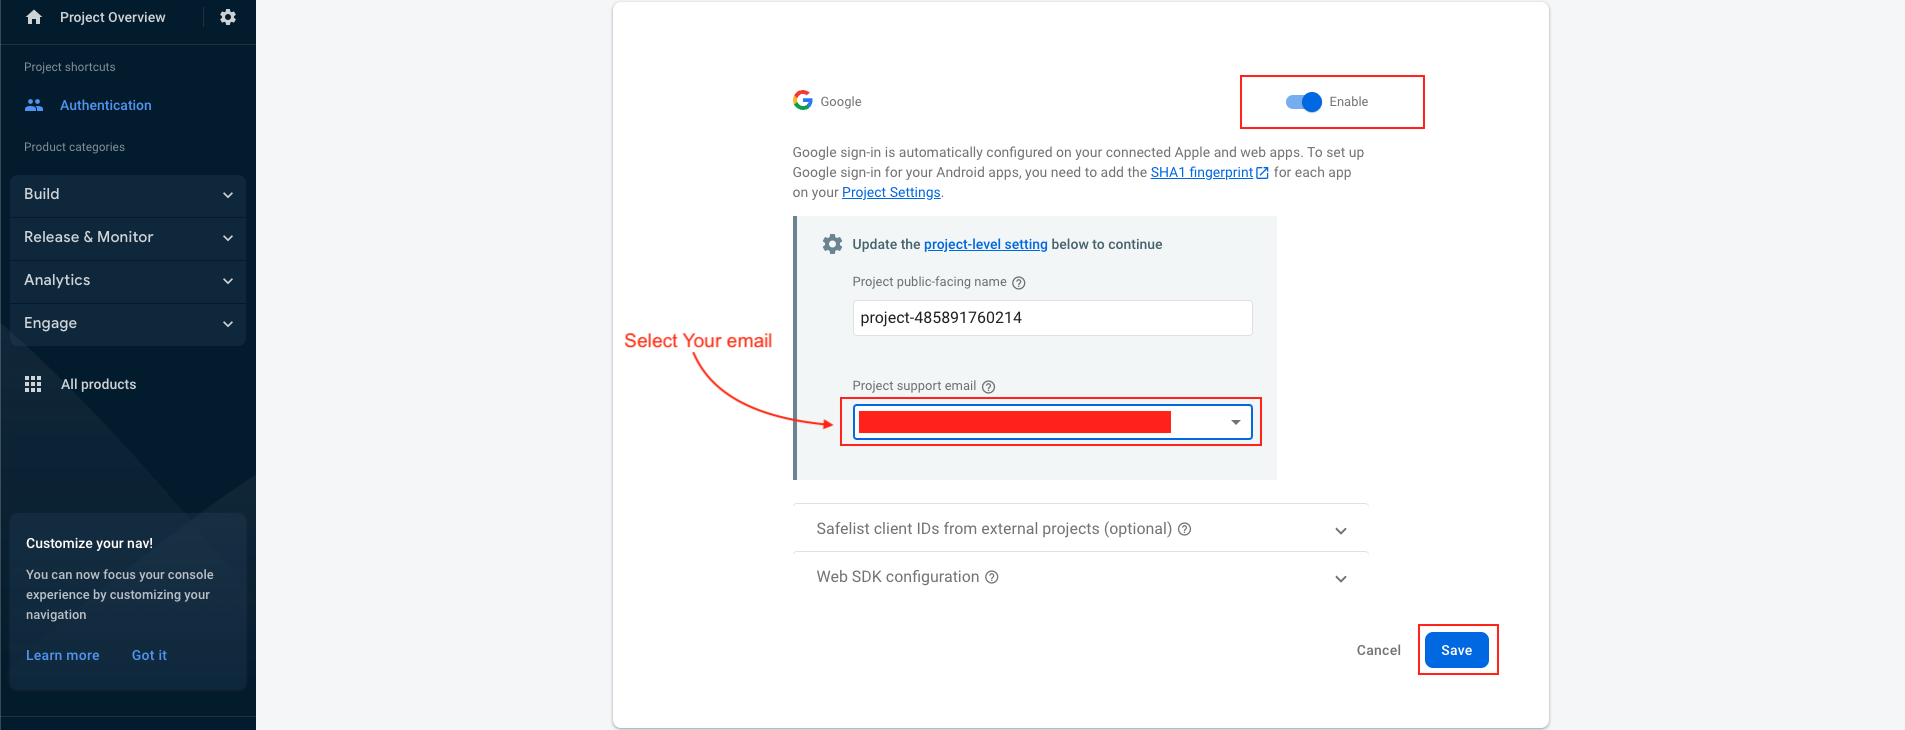
- Click to Enable. Select your support email and save.
- Google sign-in method has been successfully enabled.

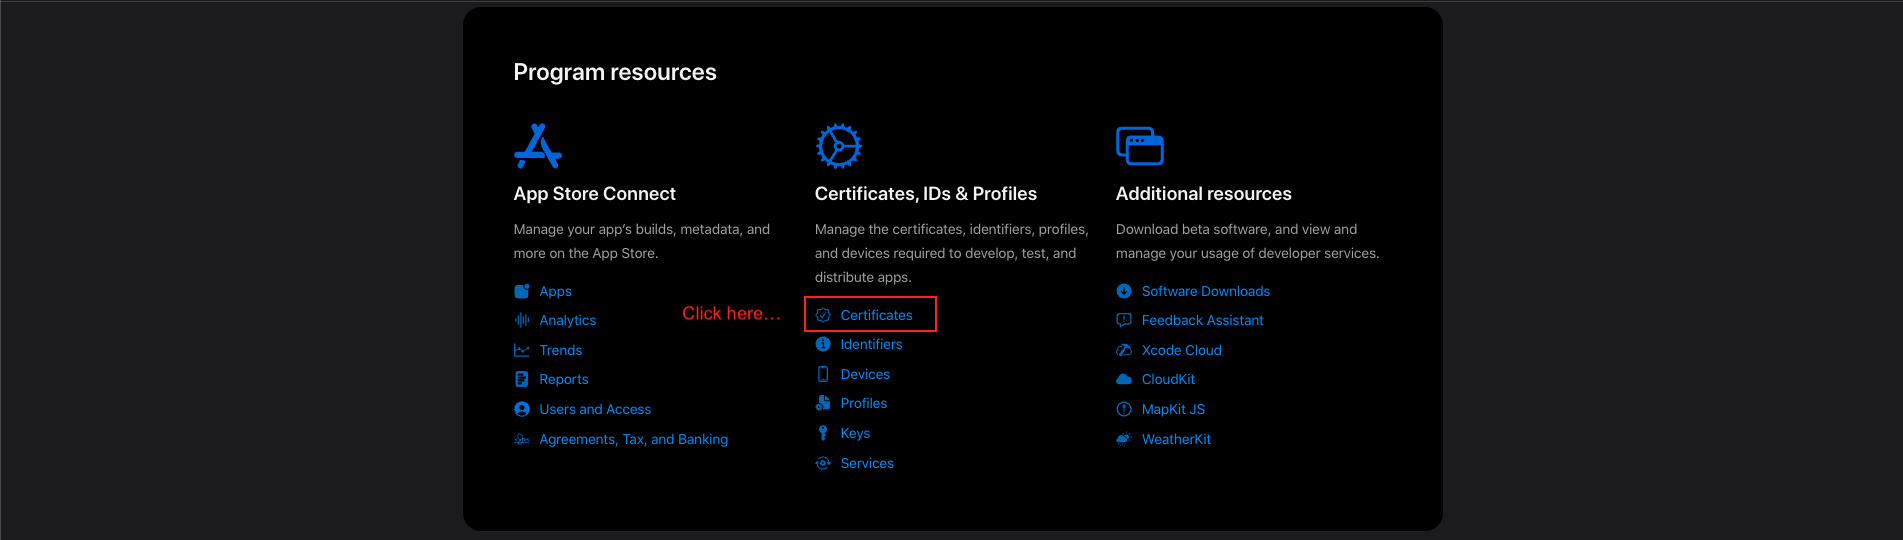
Create APNs Auth Key For Push Notification
- Navigate to https://developer.apple.com/account. Log in using your Apple developer credentials.
- Obtain a provider certificate from your developer account. This can be found in the "Certificates" section.
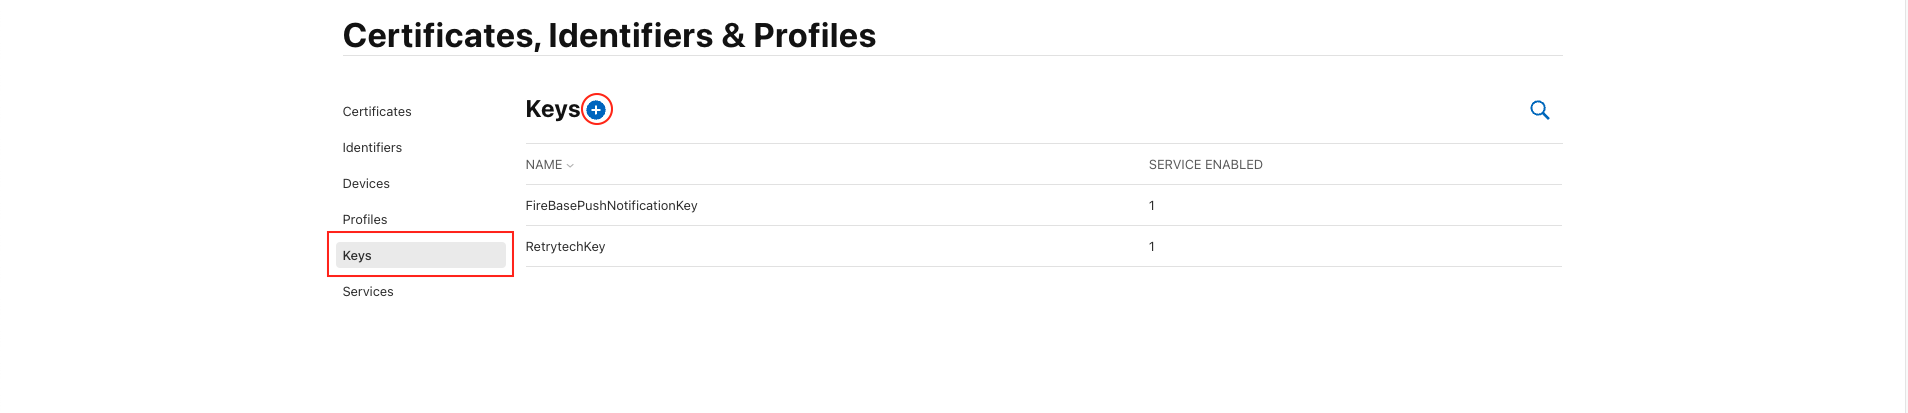
- Select the "Certificate, IDs & Profiles" tab.
- Select the "Keys" tab. Click on the "+" button.
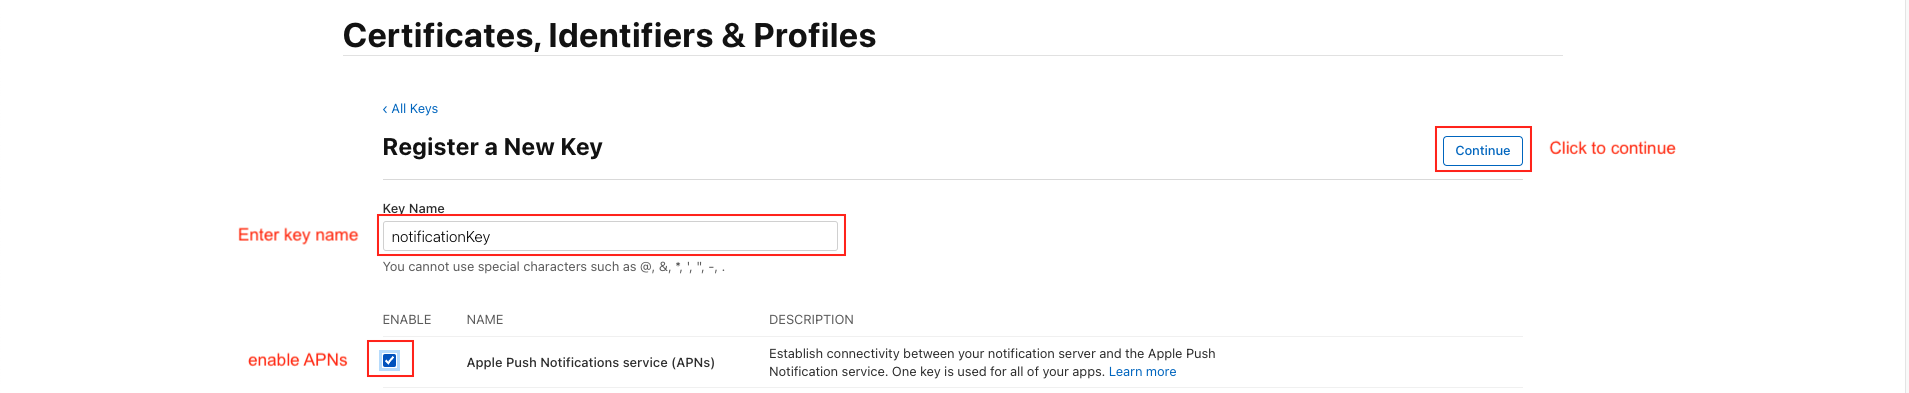
- A key can be generated which gives the FCM full access over the Apple Push Notification service (APNs). On the "Keys" menu item, register a new key. The name of the key can be anything, however you must ensure the APNs service is enabled.
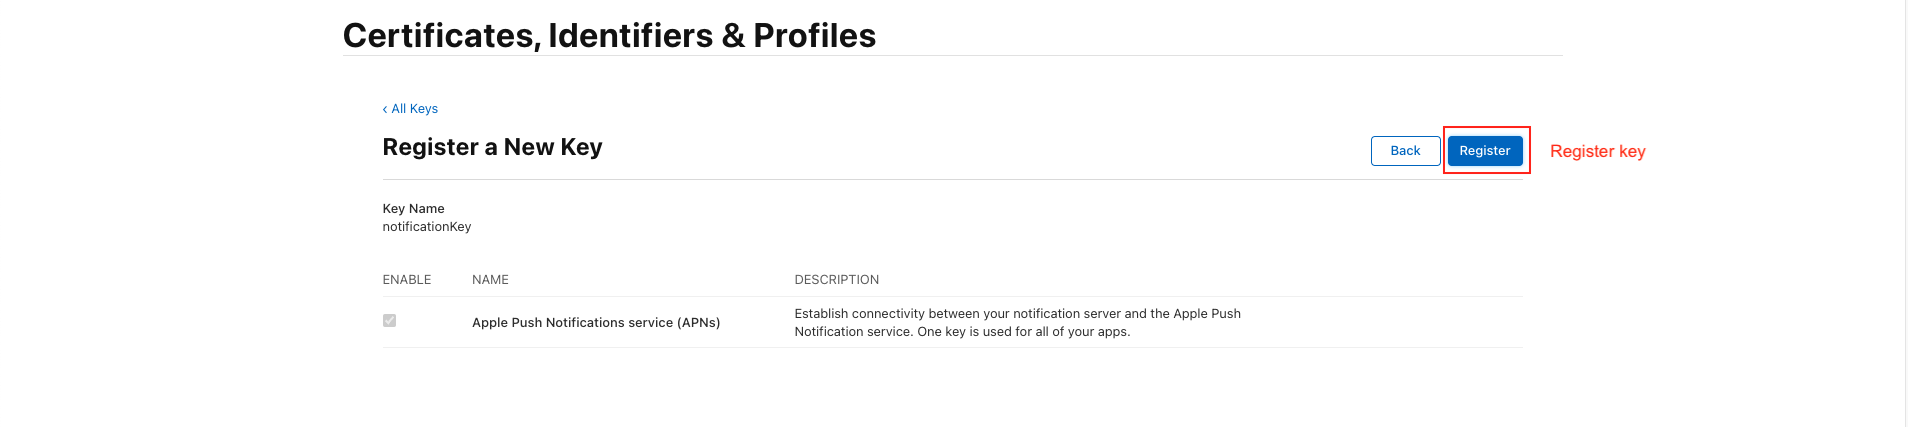
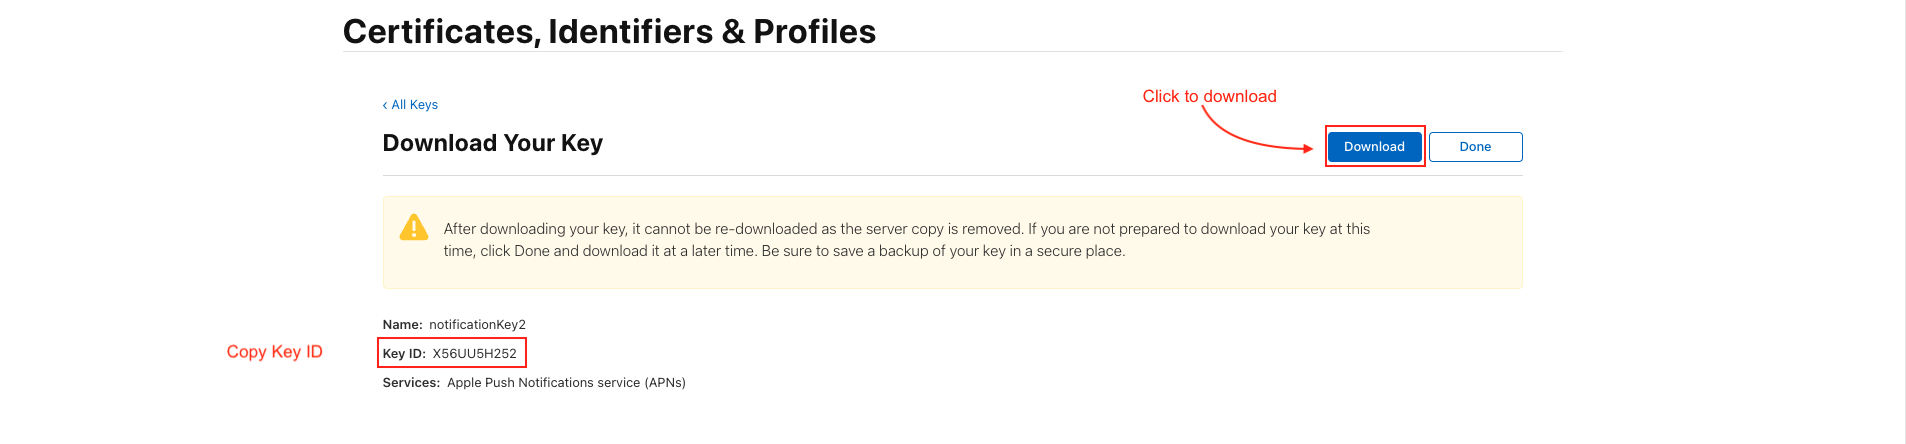
- Click "Continue" & then "Save". Once saved, you will be presented with a screen displaying the private "Key ID" & the ability to download the key. Copy the ID, and download the file to your local machine.
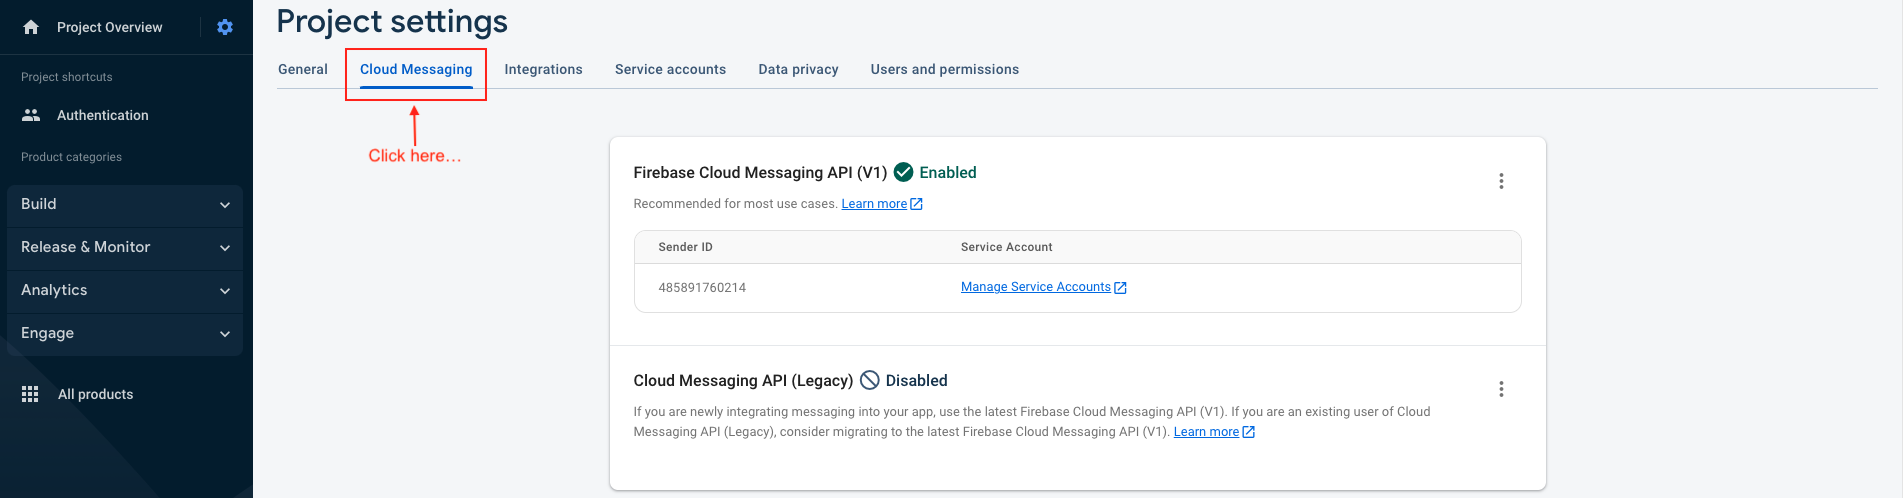
- Copy the Key ID and download the file. The file & Key ID can now be added to your Firebase Project. On the Firebase Console, navigate to the "Project settings" and select the "Cloud Messaging" tab. Select your iOS application under the "iOS app configuration" heading.
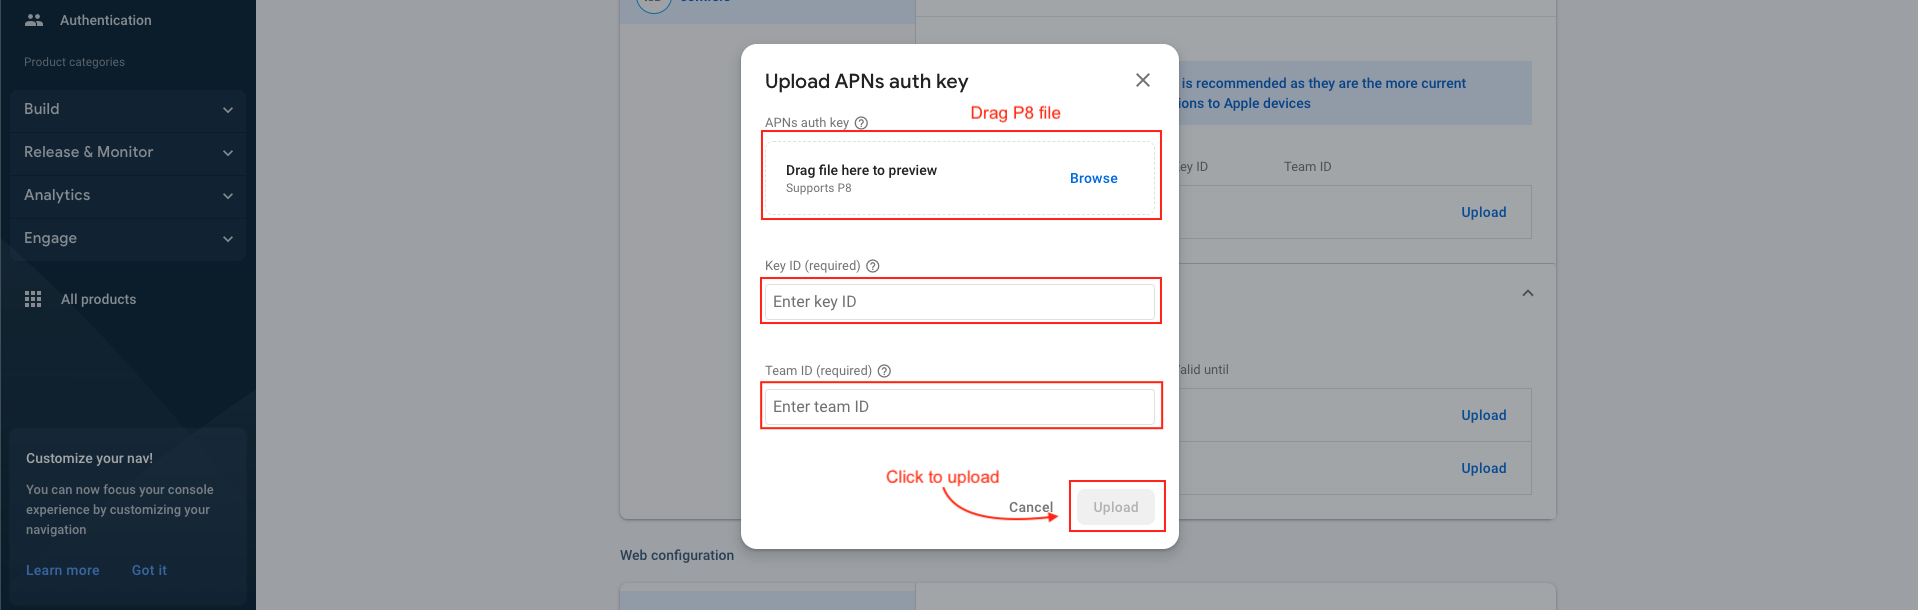
- Upload the downloaded file and enter the Key & Team IDs.

Deep Link
- Go to your Flutter project.
For Android:
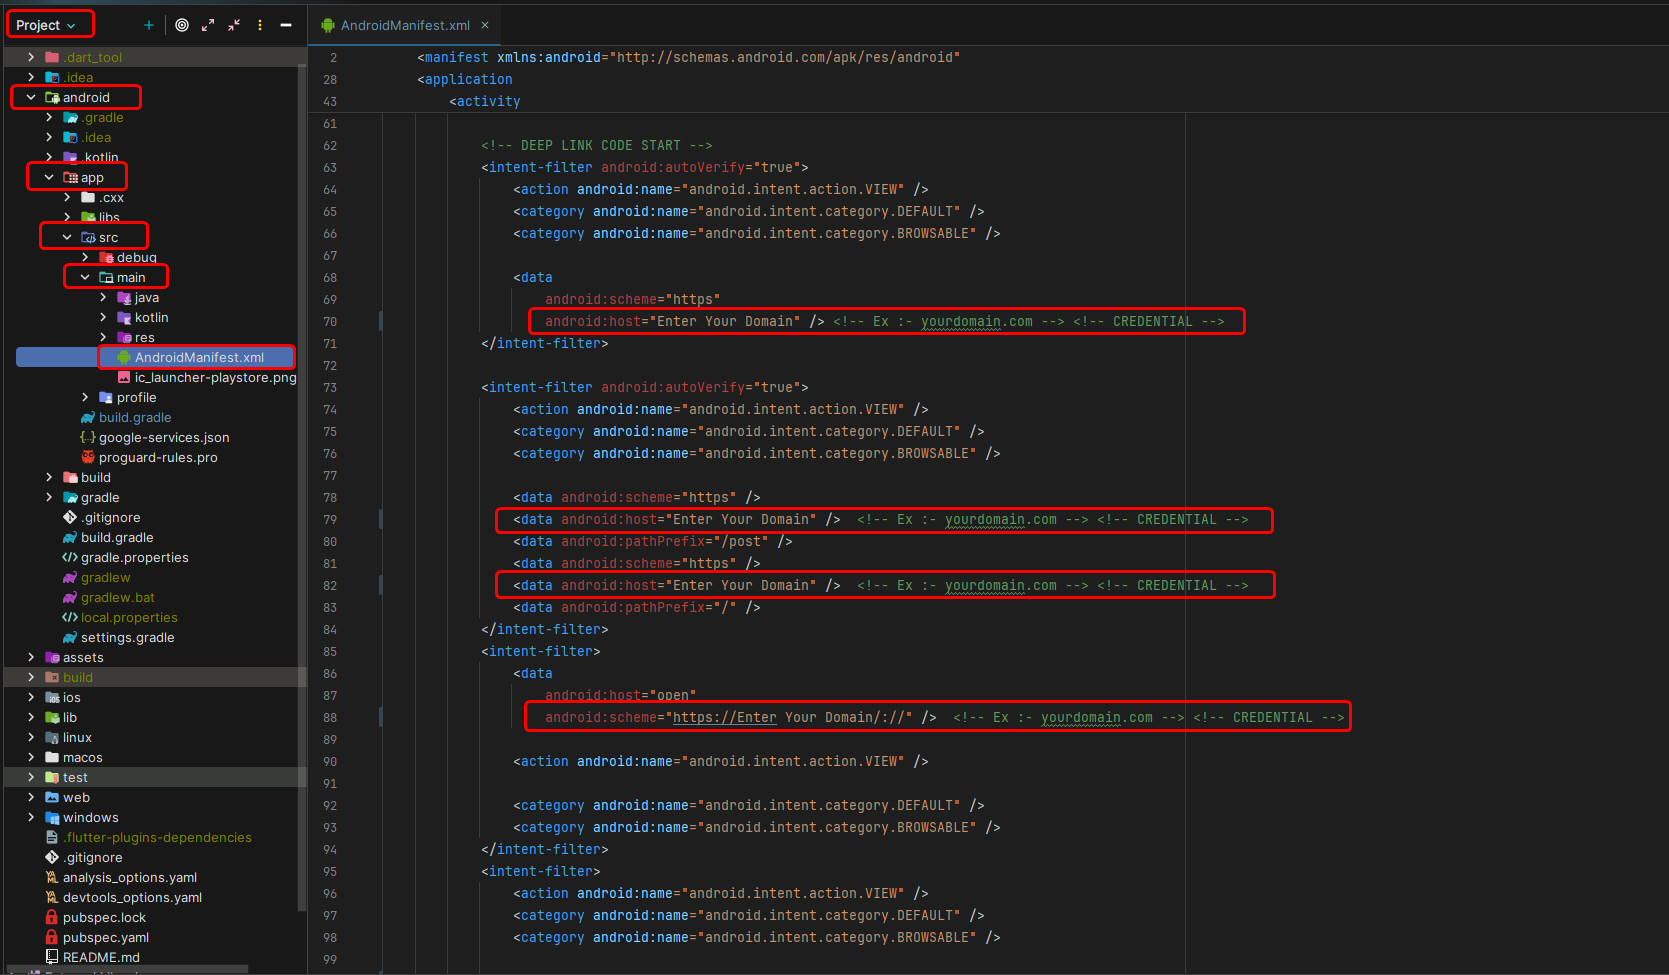
- Open the Android directory and go to
app > src > main > AndroidManifest.xmland paste the required code. - Make changes to this file (
lib > utils > android_deeplink) and save the file.
Android Asset Links Setup:
- Create the directory path for
/.well-known/assetlinks.jsonon Ubuntu 24.04, follow these exact steps: - Go to your website root directory (example:
/home/admin/backend)
cd /home/admin/backend
- Create the .well-known folder:
sudo mkdir -p .well-known
- Give proper permissions (if required):
sudo chmod 755 .well-known
- Create the assetlinks.json file inside it:
sudo nano .well-known/assetlinks.json
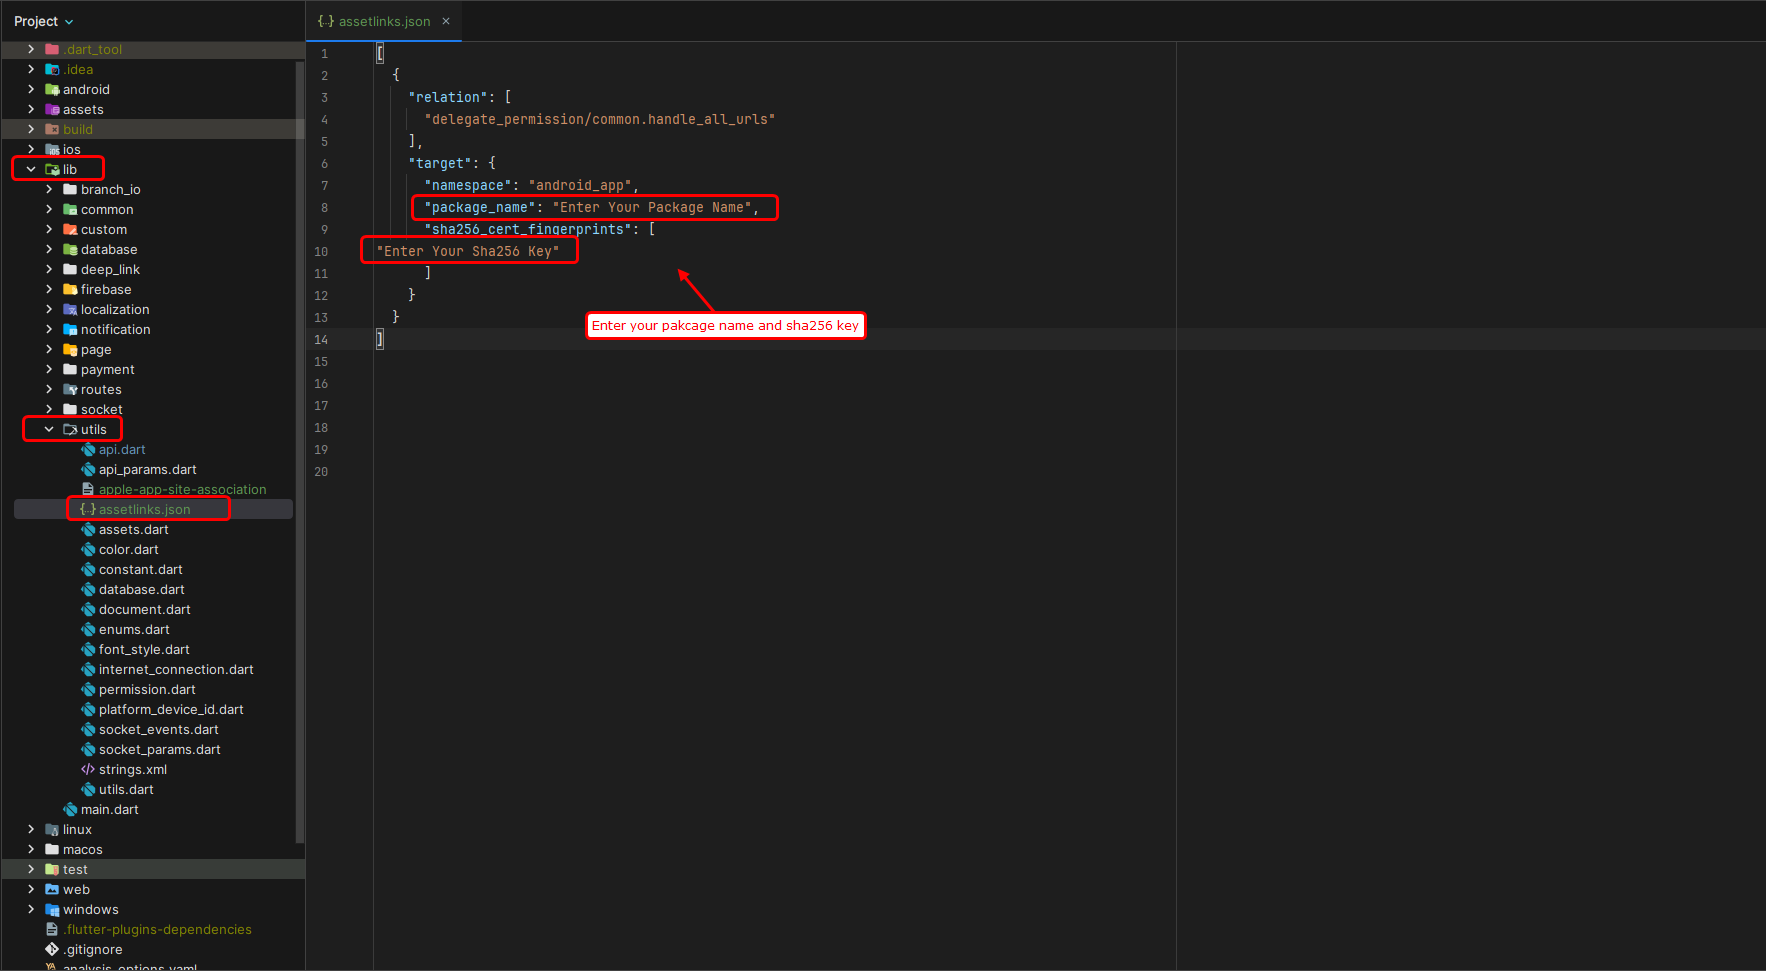
- Paste your assetlinks.json content into the file, then save and exit:
[
{
"relation": ["delegate_permission/common.handle_all_urls"],
"target": {
"namespace": "android_app",
"package_name": "Enter Your Package Name",
"sha256_cert_fingerprints": [
"Enter Your Sha256 Key"
]
}
}
]
Nginx Configuration:
- Make sure your Nginx configuration allows dot-prefixed folders. Add or verify this block in your server config:
location /.well-known/ {
allow all;
default_type application/json;
try_files $uri =404;
}
- Reload Nginx:
sudo systemctl reload nginx
- Open the following URL in your browser to verify:
https://your-domain.com/.well-known/assetlinks.json - If the JSON file loads correctly, the setup is complete.
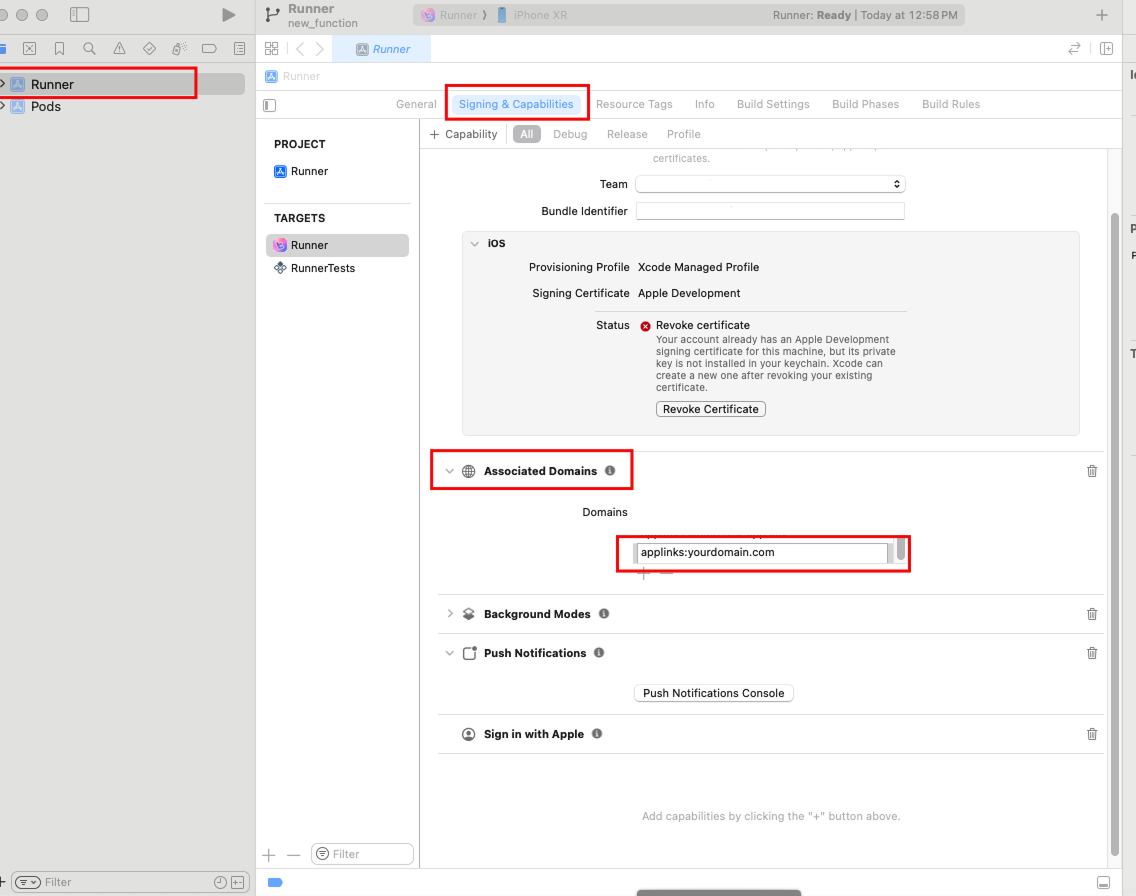
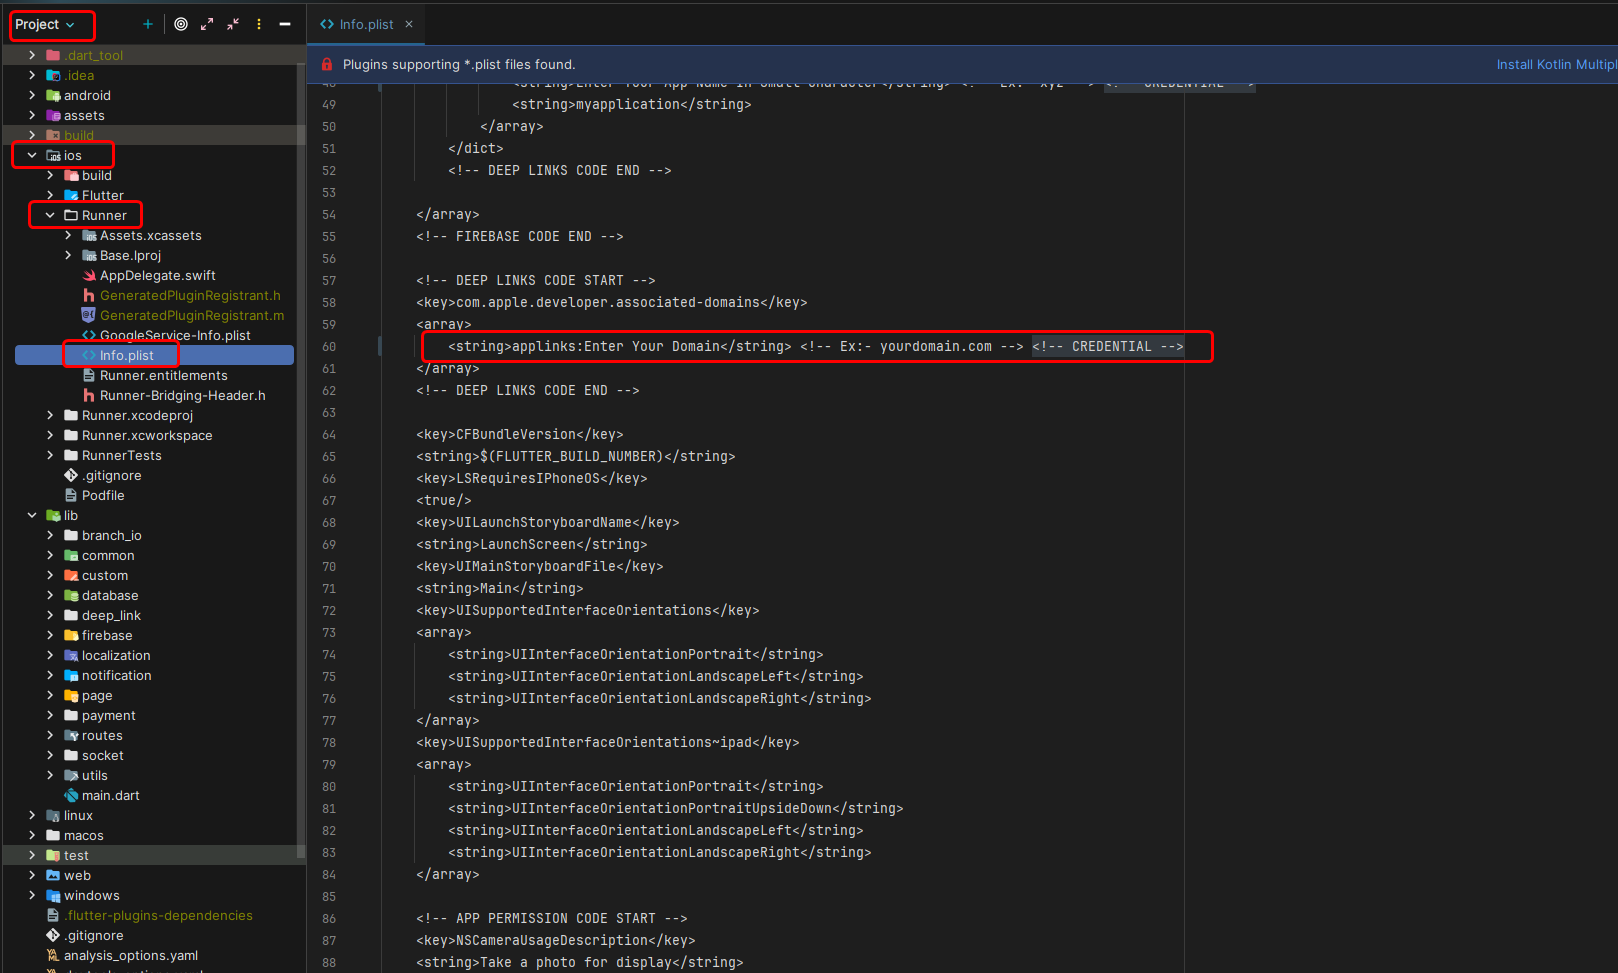
For iOS:
- Open the iOS directory in Xcode. Go to
Runner > Runner > Signing & Capabilitiesand paste the required configuration. - Go to
Runner > Info.plistand paste the required code.
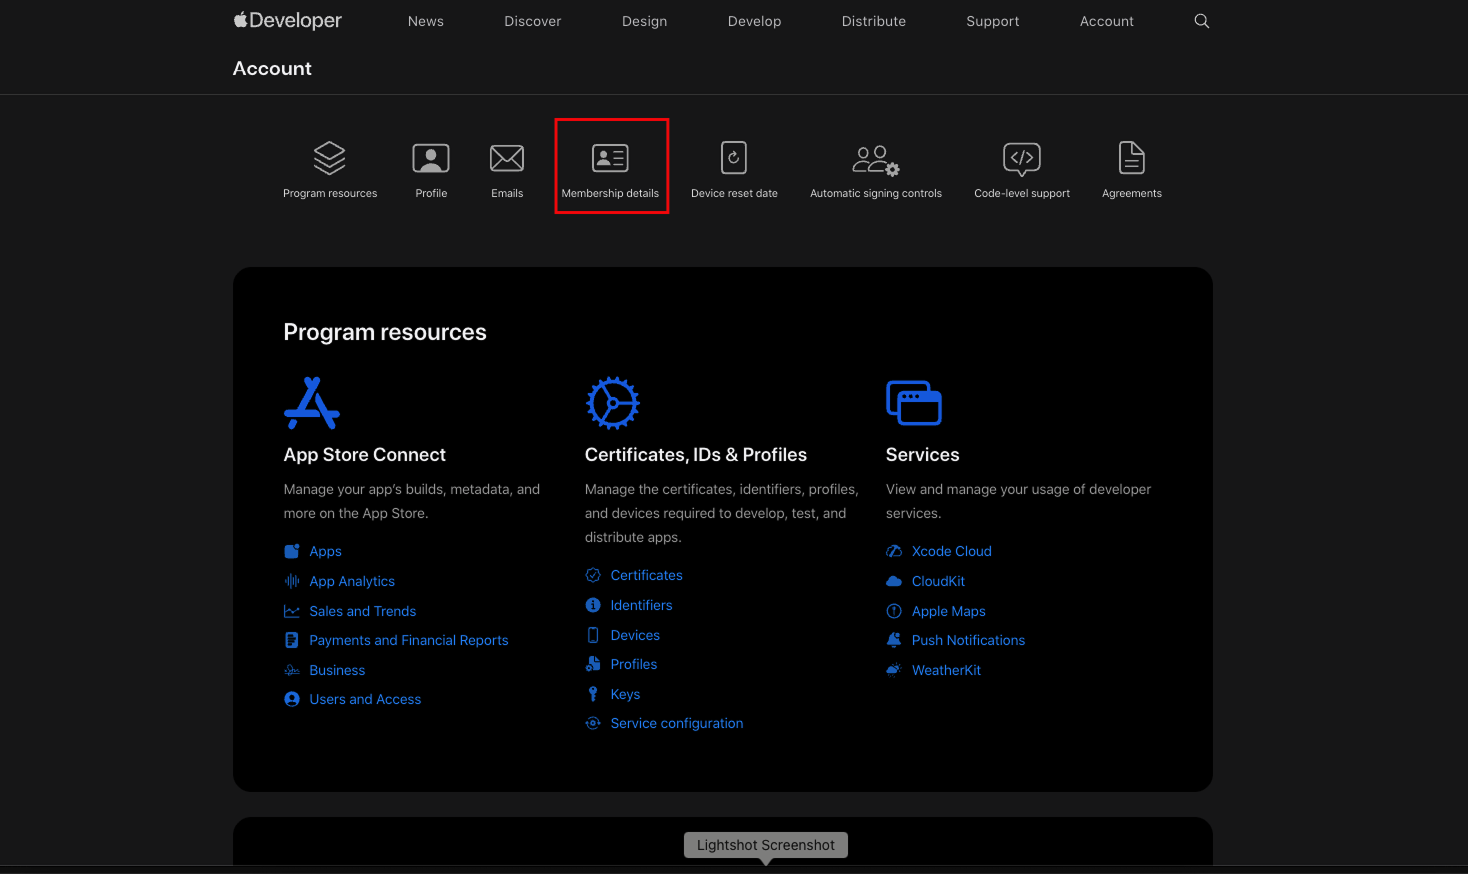
Get Team ID:
- Navigate to https://developer.apple.com/account/ and log in using your Apple Developer credentials. Select the Membership details tab.
- Copy the Team ID.
- Make changes to this file (
lib > utils > ios_deeplink) and save the file.

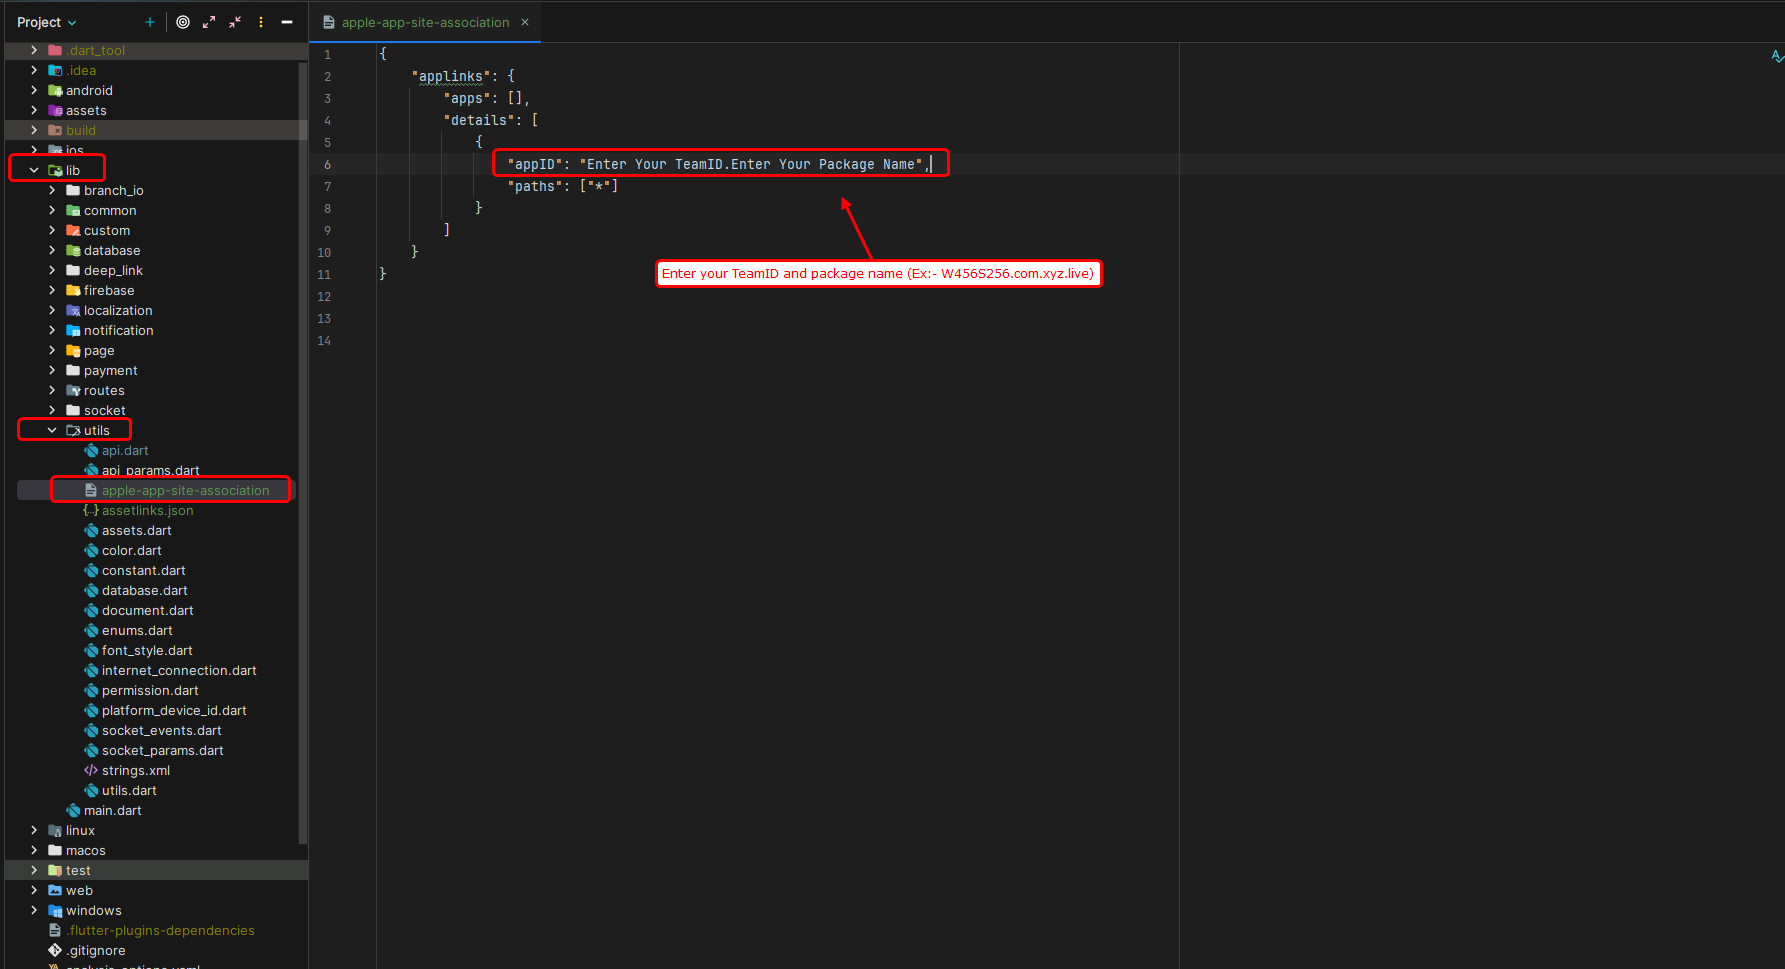
iOS Apple App Site Association Setup:
- Create the directory path for
/.well-known/apple-app-site-associationon Ubuntu 24.04:
cd /home/admin/backend
sudo mkdir -p .well-known
sudo chmod 755 .well-known
sudo nano .well-known/apple-app-site-association
- Paste your JSON content:
{
"applinks": {
"apps": [],
"details": [
{
"appID": "TEAMID.com.yourcompany.yourapp",
"paths": ["*"]
}
]
}
}
Nginx Configuration for iOS:
- Make sure Nginx serves the file without redirects and with proper MIME type. Add or verify this block in your server config:
location = /.well-known/apple-app-site-association {
default_type application/json;
try_files $uri =404;
}
location = /apple-app-site-association {
default_type application/json;
try_files $uri =404;
}
sudo systemctl reload nginx
- Verify by opening:
https://your-domain.com/.well-known/apple-app-site-association
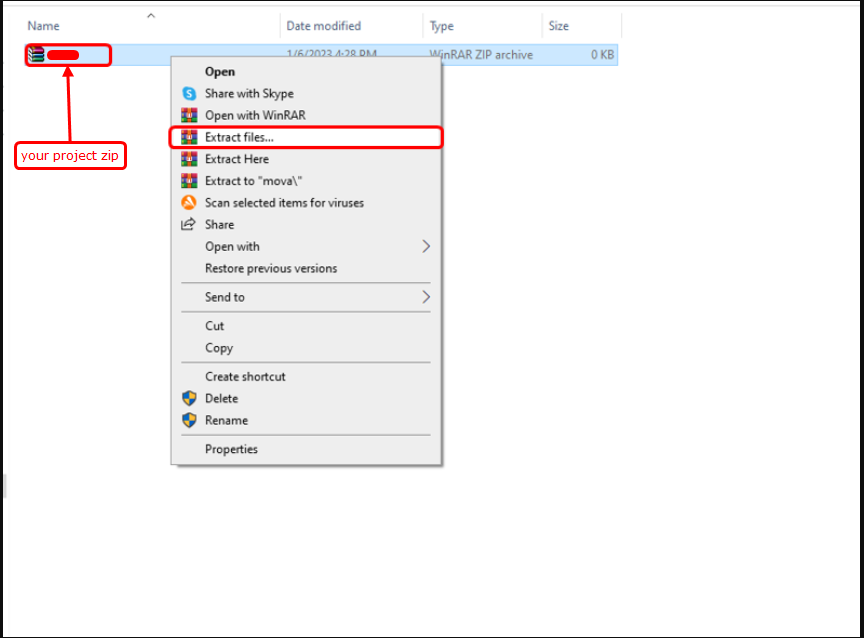
Importing Project
- To import the app, simply open Android Studio and import/open the template. Make sure to wait for all the processes (the Gradle Build) to complete before continuing to the next step.
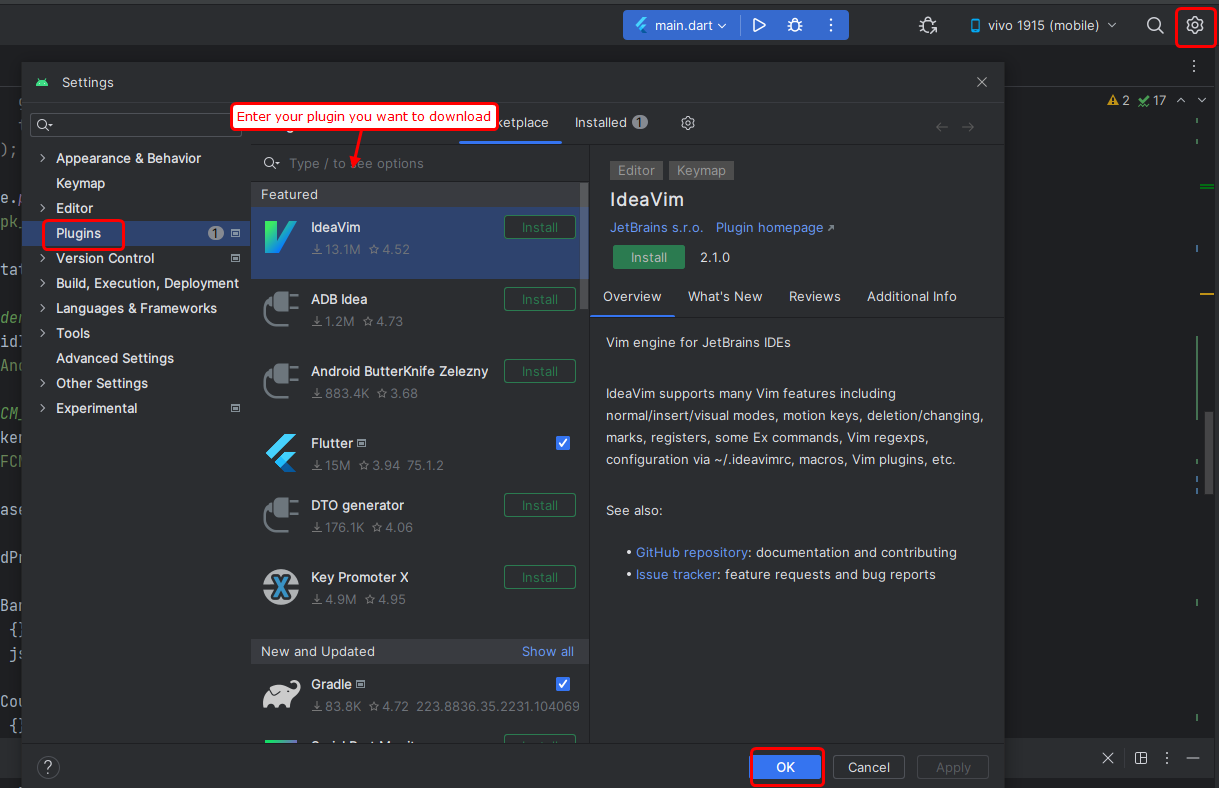
- Set up your editor – Install the Flutter and Dart plugins. To install Flutter and Dart plugins firstly, click on setting button on corner and one pop-up will come up "plugins" and enter your plugins name you want to install.
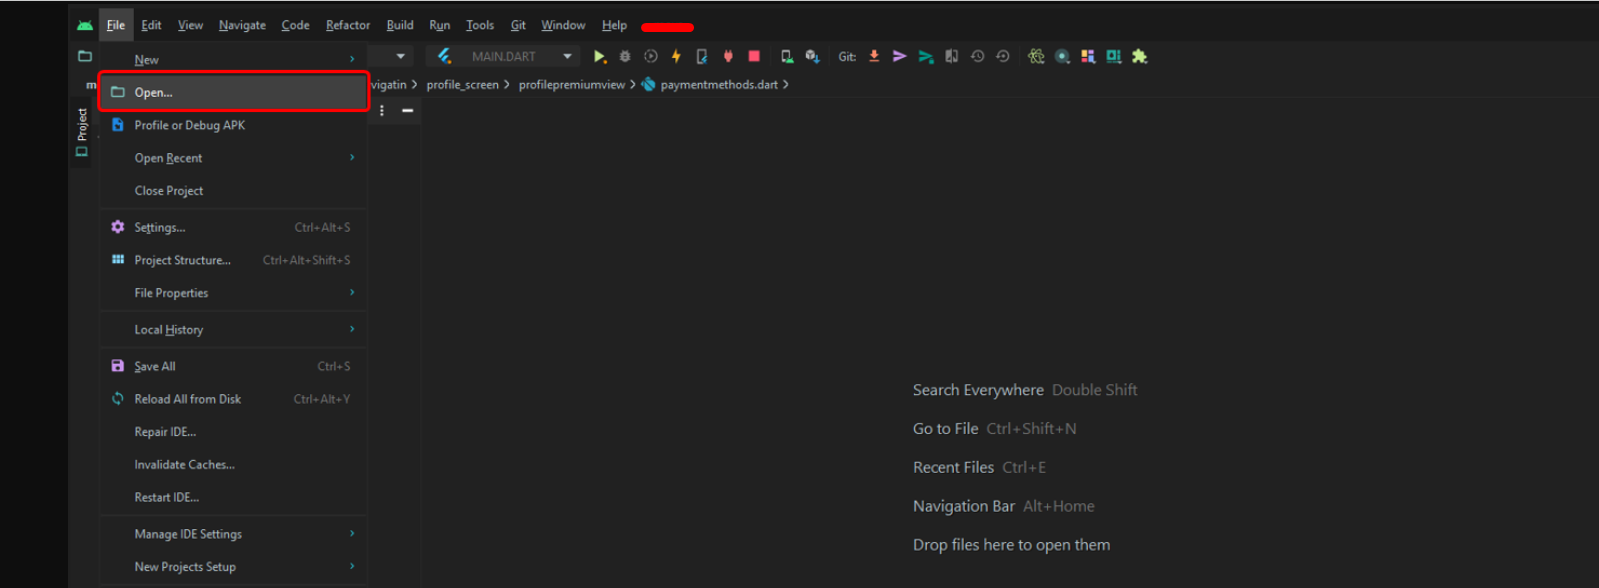
- Click on the Open and open your project.
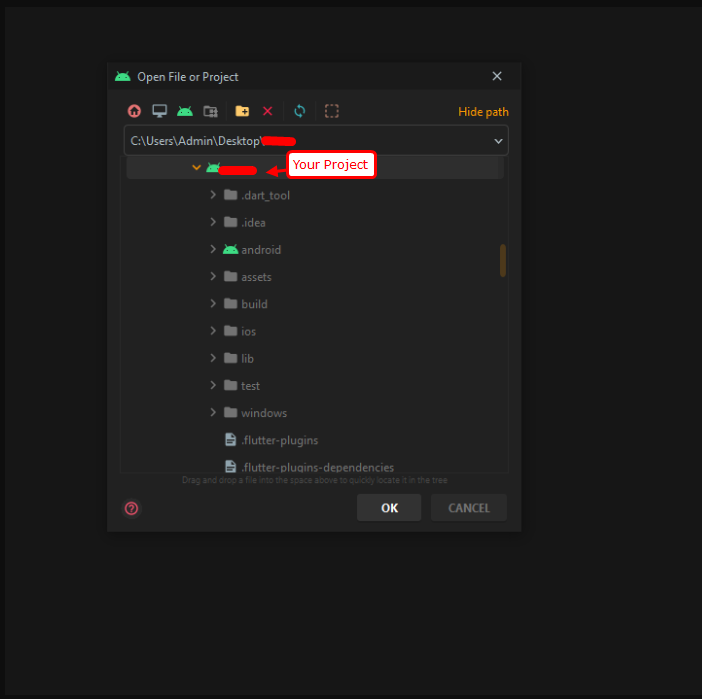
- As soon as one pop-up will come up and select your project and then click on "Ok" button.
- Additional steps: Sometimes, the Gradle Build fails. In some cases additional components are needed, Android Studio will ask you to download these additional SDK components in the 'messages' tab, simply follow the instructions provided to install and download the additional components.
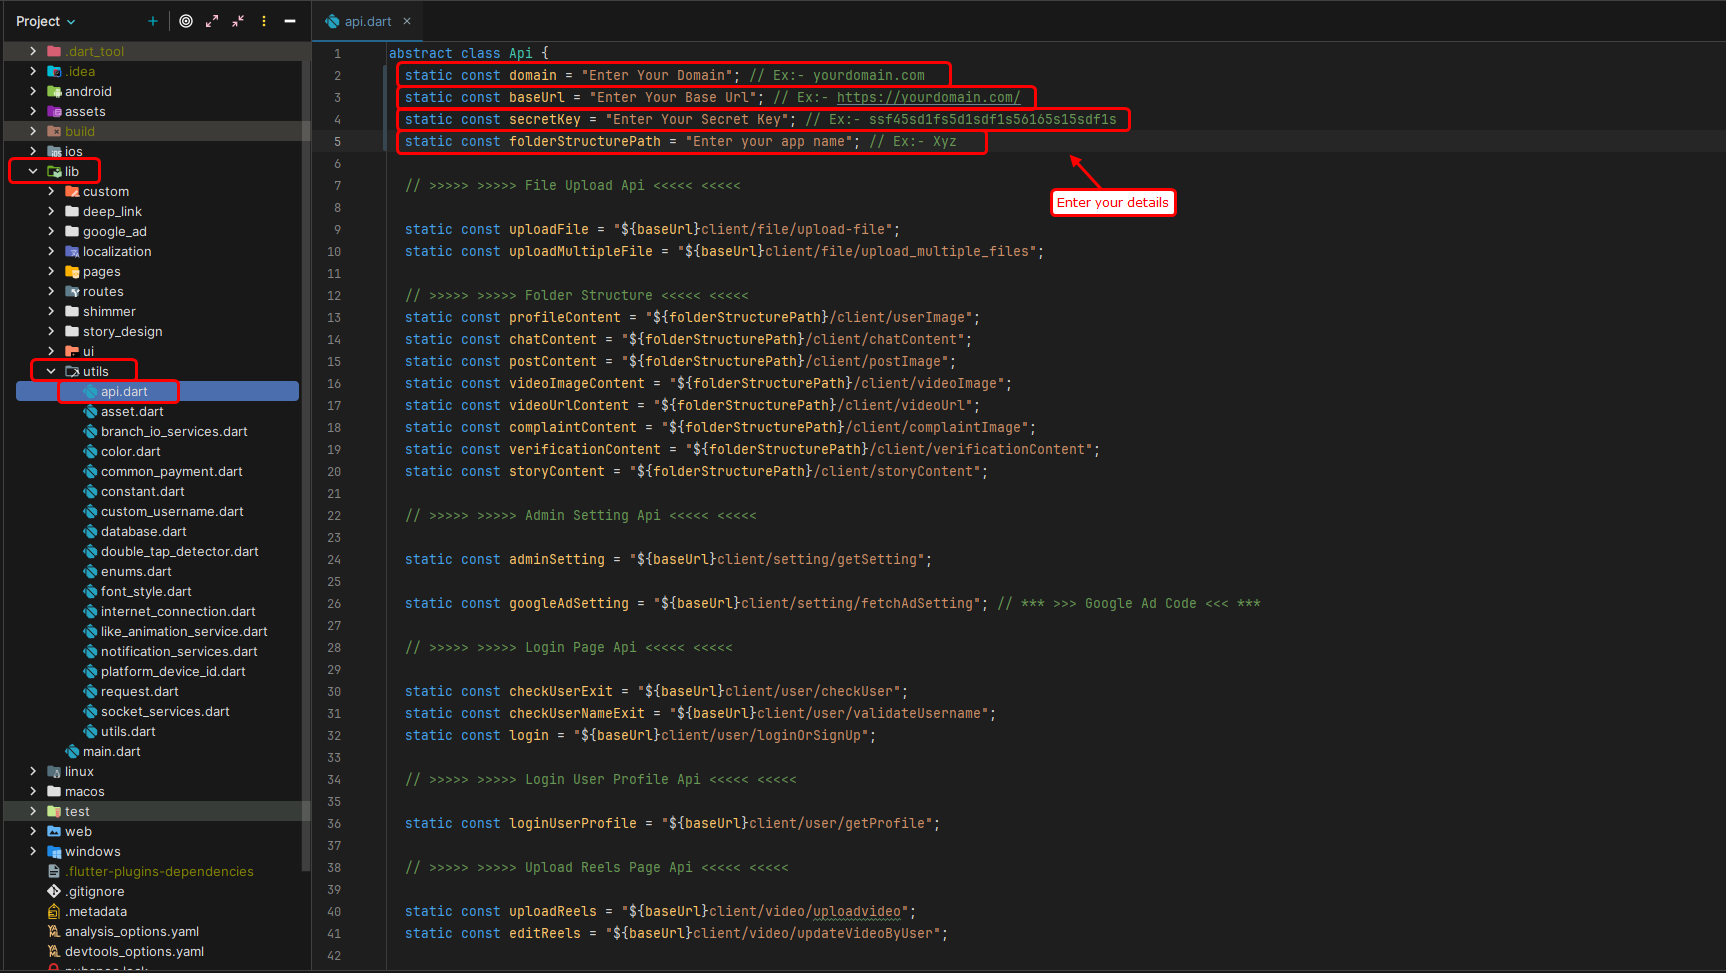
SetUp baseURl and key
- Change baseUrl and key in
lib > utiles > app_url.dartas shown in the image below. This baseUrl and key should be consistently applied across our back-end, front-end and app-code to ensure uniform protection.
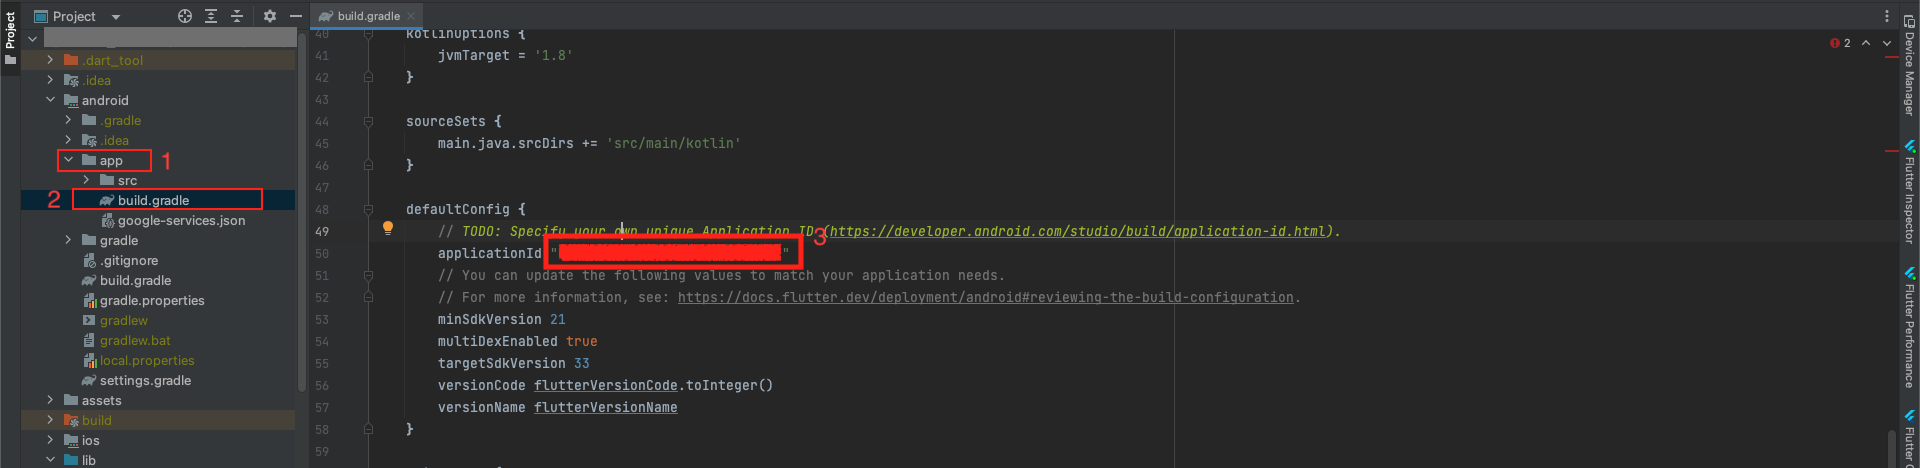
Change Package Name
Android:
- Go to
android > app - Click to
build.gradle - Here, change the applicationId. And it's done.
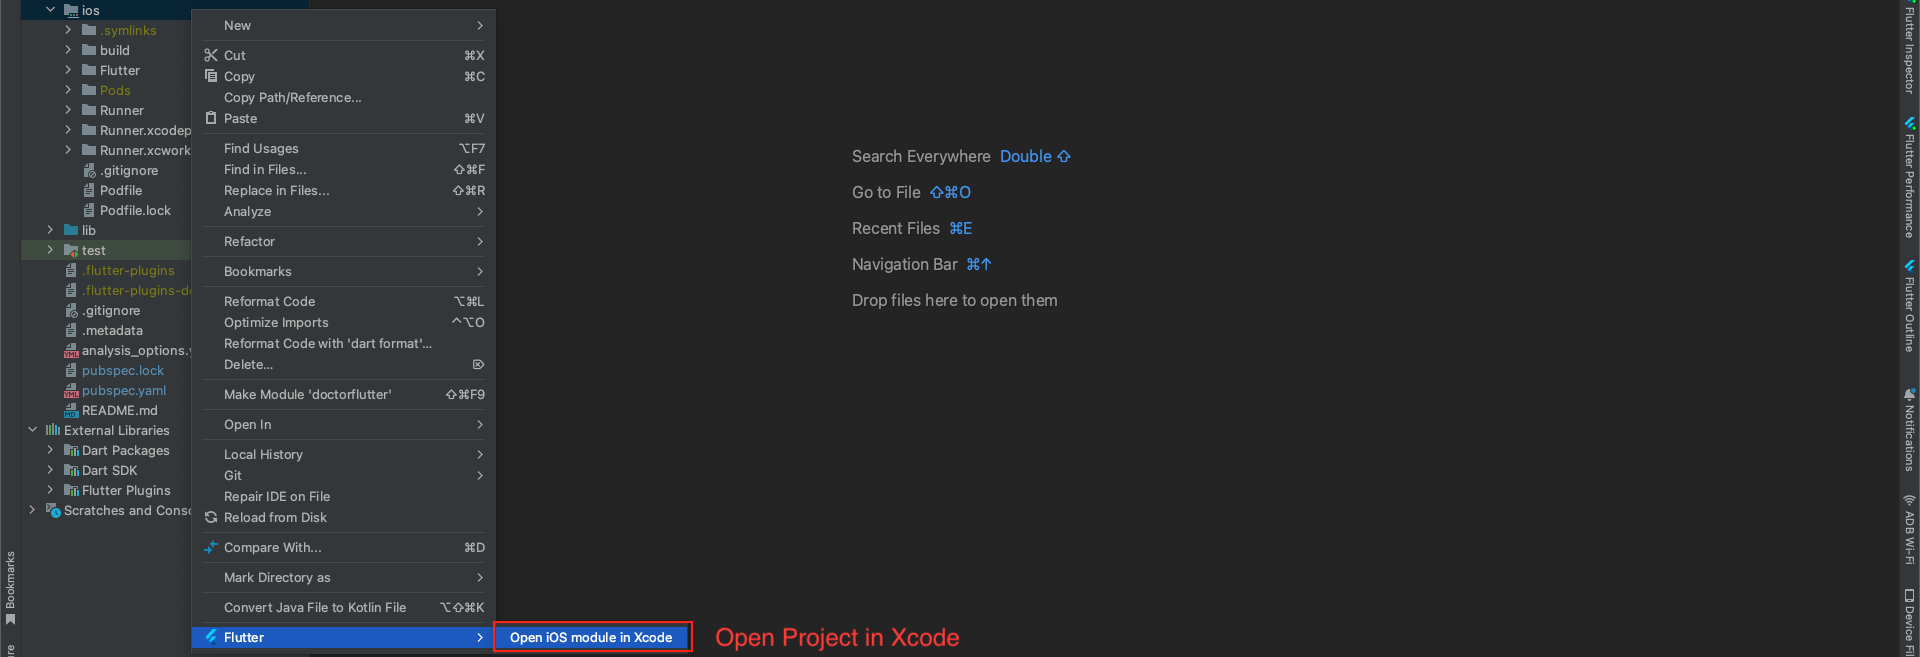
iOS:
- Now right click on iOS directory,
flutter > Open iOS module in Xcode - Once the project gets opened in Xcode successfully, follow the steps below.
- Go to
runner > Signing & Capabilities - Change your bundle identifier as you want, and it's done.

Change App Color
- Go to your project
lib > utils > color_res.dartas shown in the below image.

Change App Icon
For Generating Different Sized Icons:
- Go to https://www.appicon.co/ and upload the icon image and tick the iPhone and Android options and click on Generate. This site generates different sized Icons for both android and IOS at the same time. It will Download the Zip file named AppIcons with the android and Assets.xcassets named folders along with images for appstore and playstore which can be directly uploaded as an icon in both the stores.
- Now, open your Project in Android Studio.
Android:
- Navigate to
android/app/src/main/resand right-click on res folder and click "open in Finder". Now delete all the mipmap folders in res folder and paste the mipmap folders from AppIcon/android folder which you have downloaded.
iOS:
- Now navigate to the
ios/Runner/Assets.xcassets. Now after you are in Runner folder, right-click on Runner folder and click "open in Finder". Now delete the Assets.xcassets folder and paste the Assets.xcassets folder from AppIcon/Assets.xcassets which you have downloaded.
- After manually changing the images in android and IOS folders now go to
lib/main.dartand run the flutter project using the below command in the flutter console:
flutter run
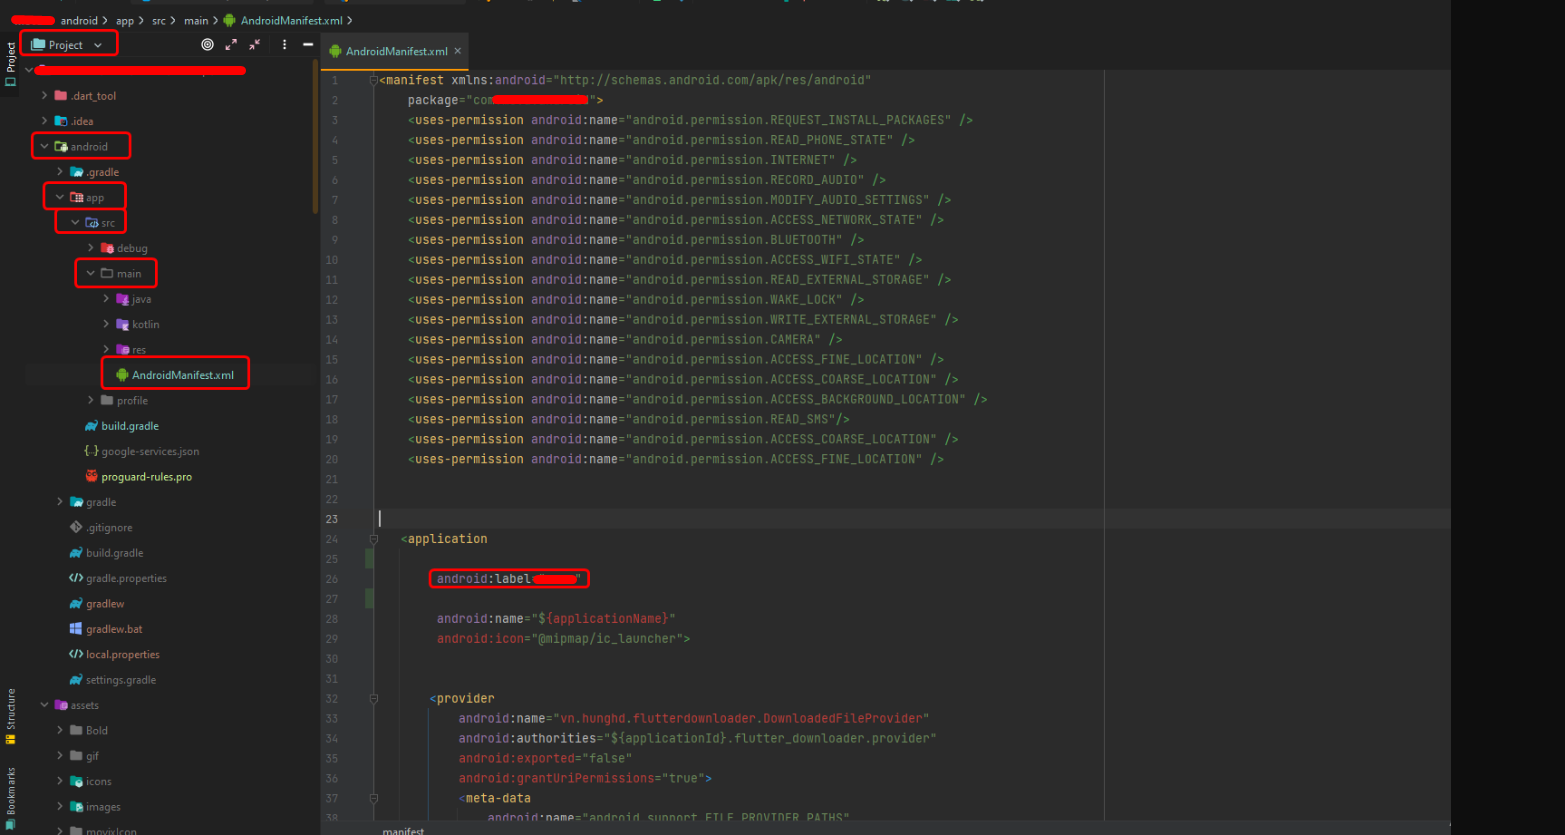
Change App Name
Android:
- Go to
android > app > src > main > AndroidManifest.xmland make changes shown in the below image.
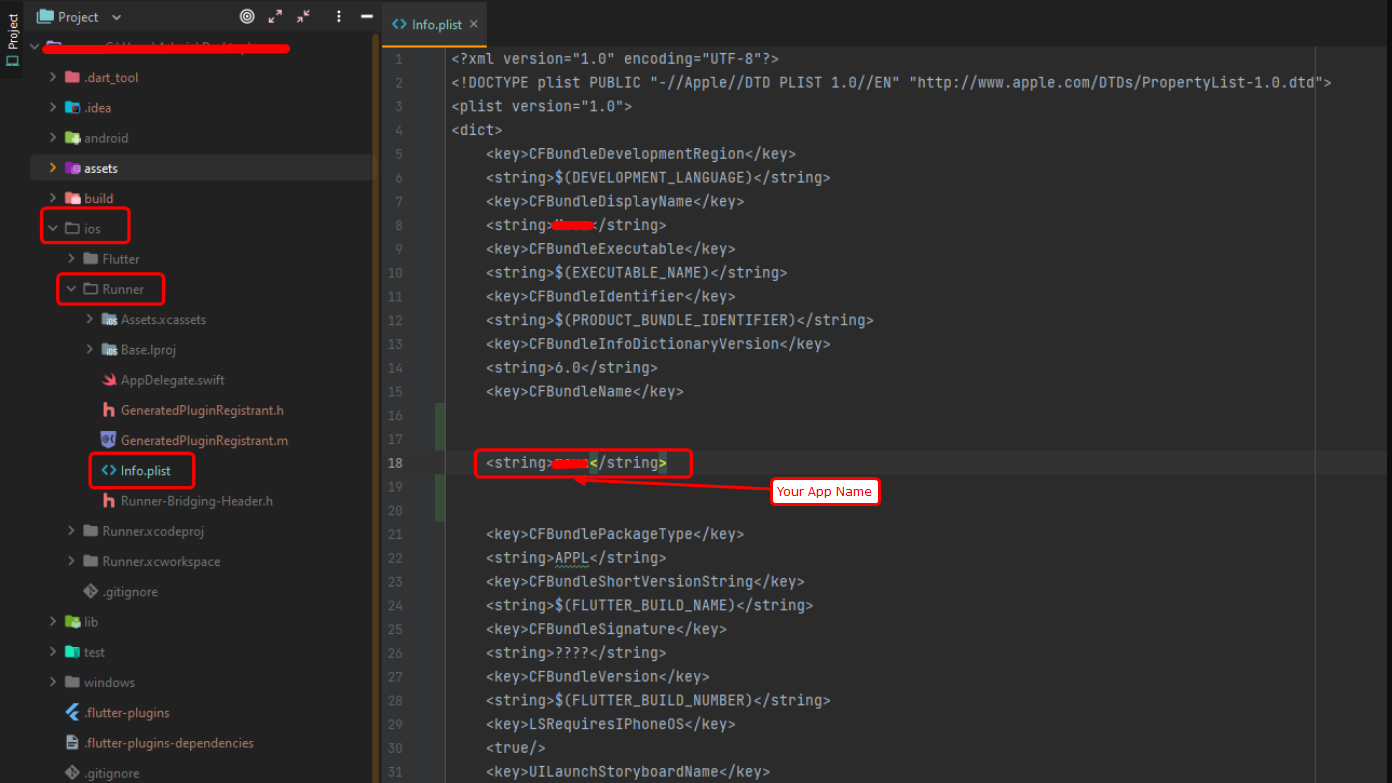
iOS:
- Now right click on iOS directory > Runner > info.plist Open iOS module in Xcode.
Build Debug APK
- APK (Application Package File) is a format used by Android operating systems for distribution and installation. After you build an application, it's quite common to build APK files to be tested across different devices. If the application is developed using Flutter, you can easily build APK files by using
flutter build apkcommand. - This includes how to set the mode (release, debug, or profile), set the main entry point, split per ABI, set target platforms, set the build name and version, build flavor APK, and obfuscate the code.
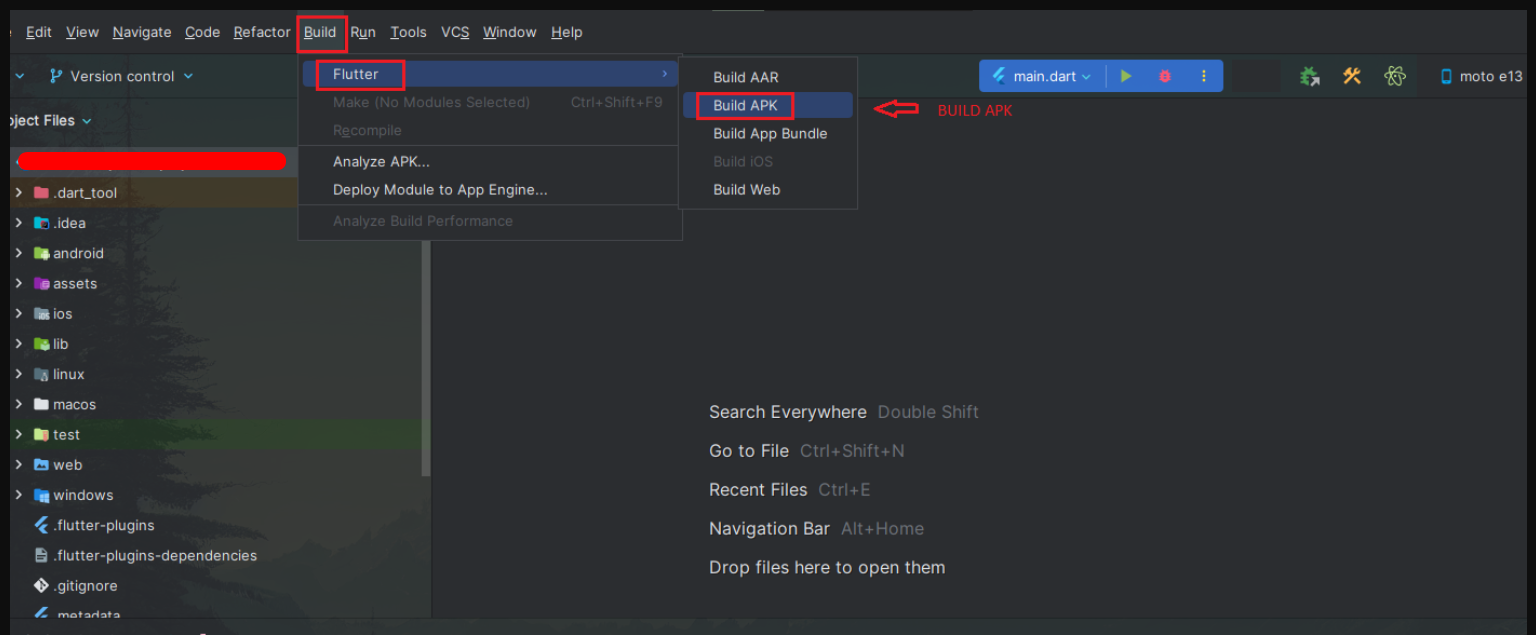
- Go to
project location > Build > Flutter > Build APK
Release APK
- Run the following command as shown in image below:
flutter build apk --release
- Once you have successfully generated the APK as shown in the image below, it will be automatically saved to the specified destination.


Support
- If you face any issues with the code, Please contact here for support: https://wa.me/+639276580718
- Our technical team will review your request and respond within 24–48 hours.
- Thank you for your patience and cooperation.